Audit: Mitigation Permissive Policy
Configuring the Solution
This solution requires a Lambda function, a Role and an SNS topic that were created during the preparation. In this step, you will configure AWS IoT Device Defender Audit to send Findings to the SNS topic.
- Open the AWS IoT console
- In the left navigation pane, choose Defend, and then choose Settings
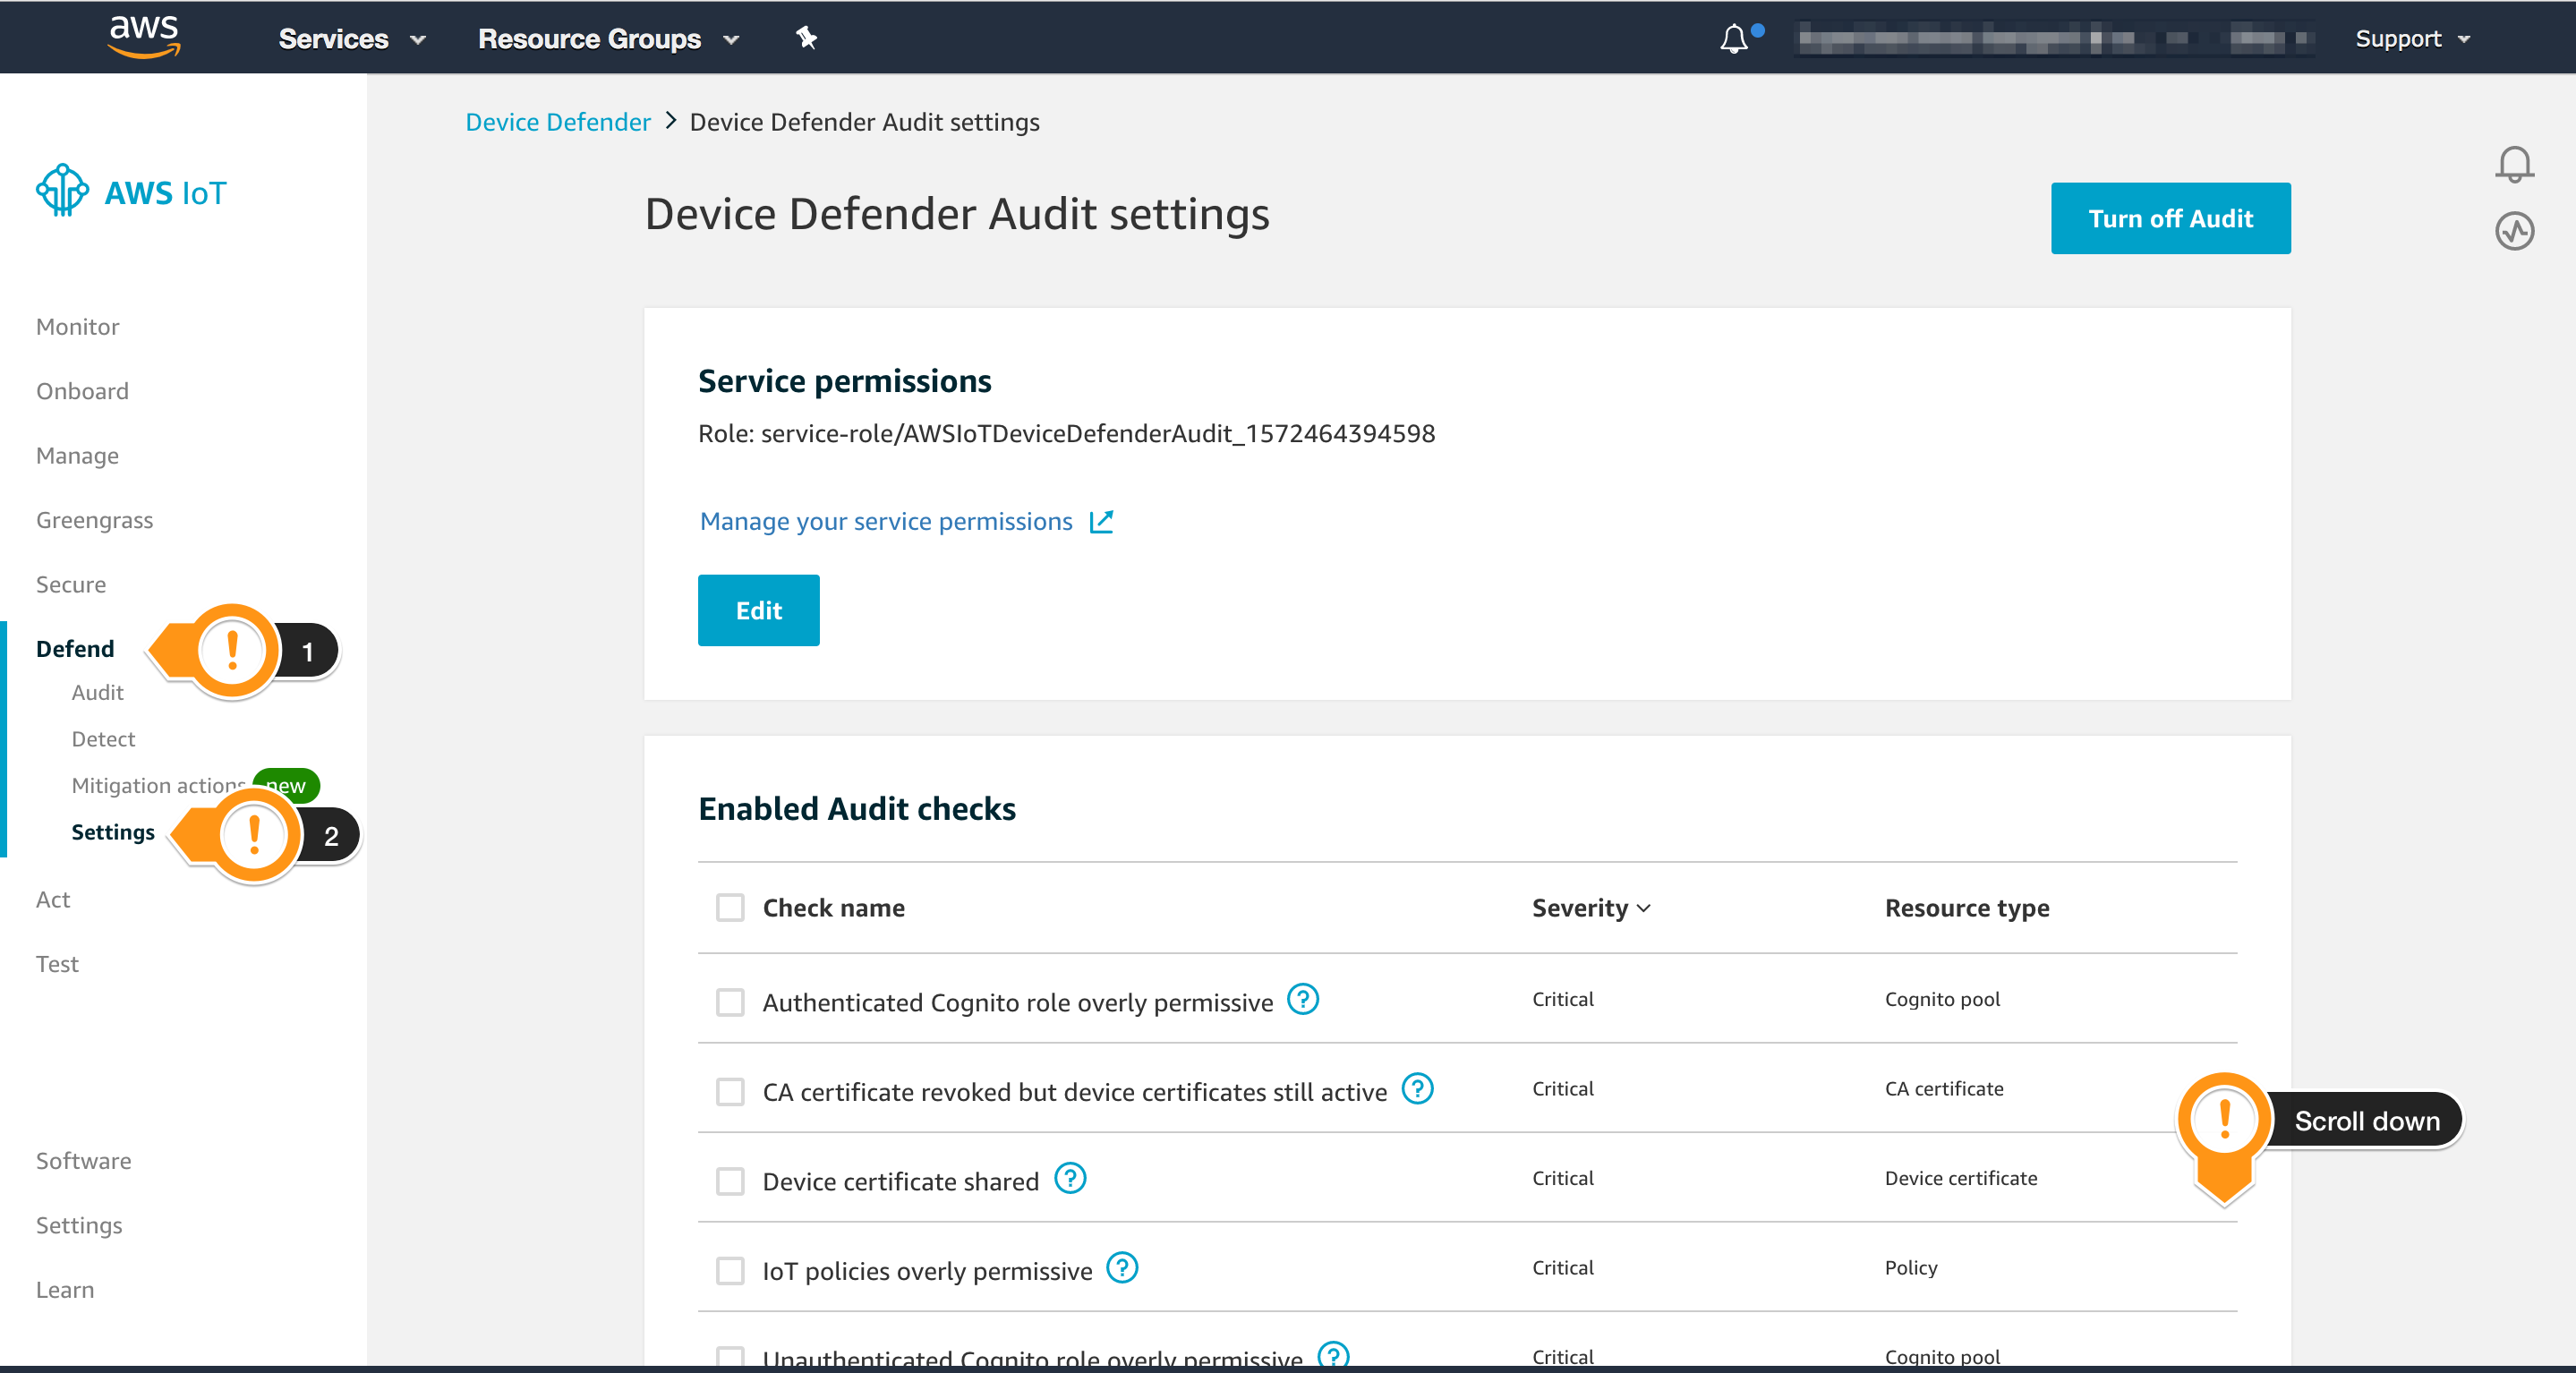
- Scroll down and locate the session SNS Alerts
- Choose Edit

DDA stands for Device Defender Audit. The Topic and Role used below were created during the preparation.
- Choose Enabled
- Locate the Topic
DDA_Findingsclicking on Select - Locate the Role containing
DDAtoSNSRoleclicking on Select - Choose Update
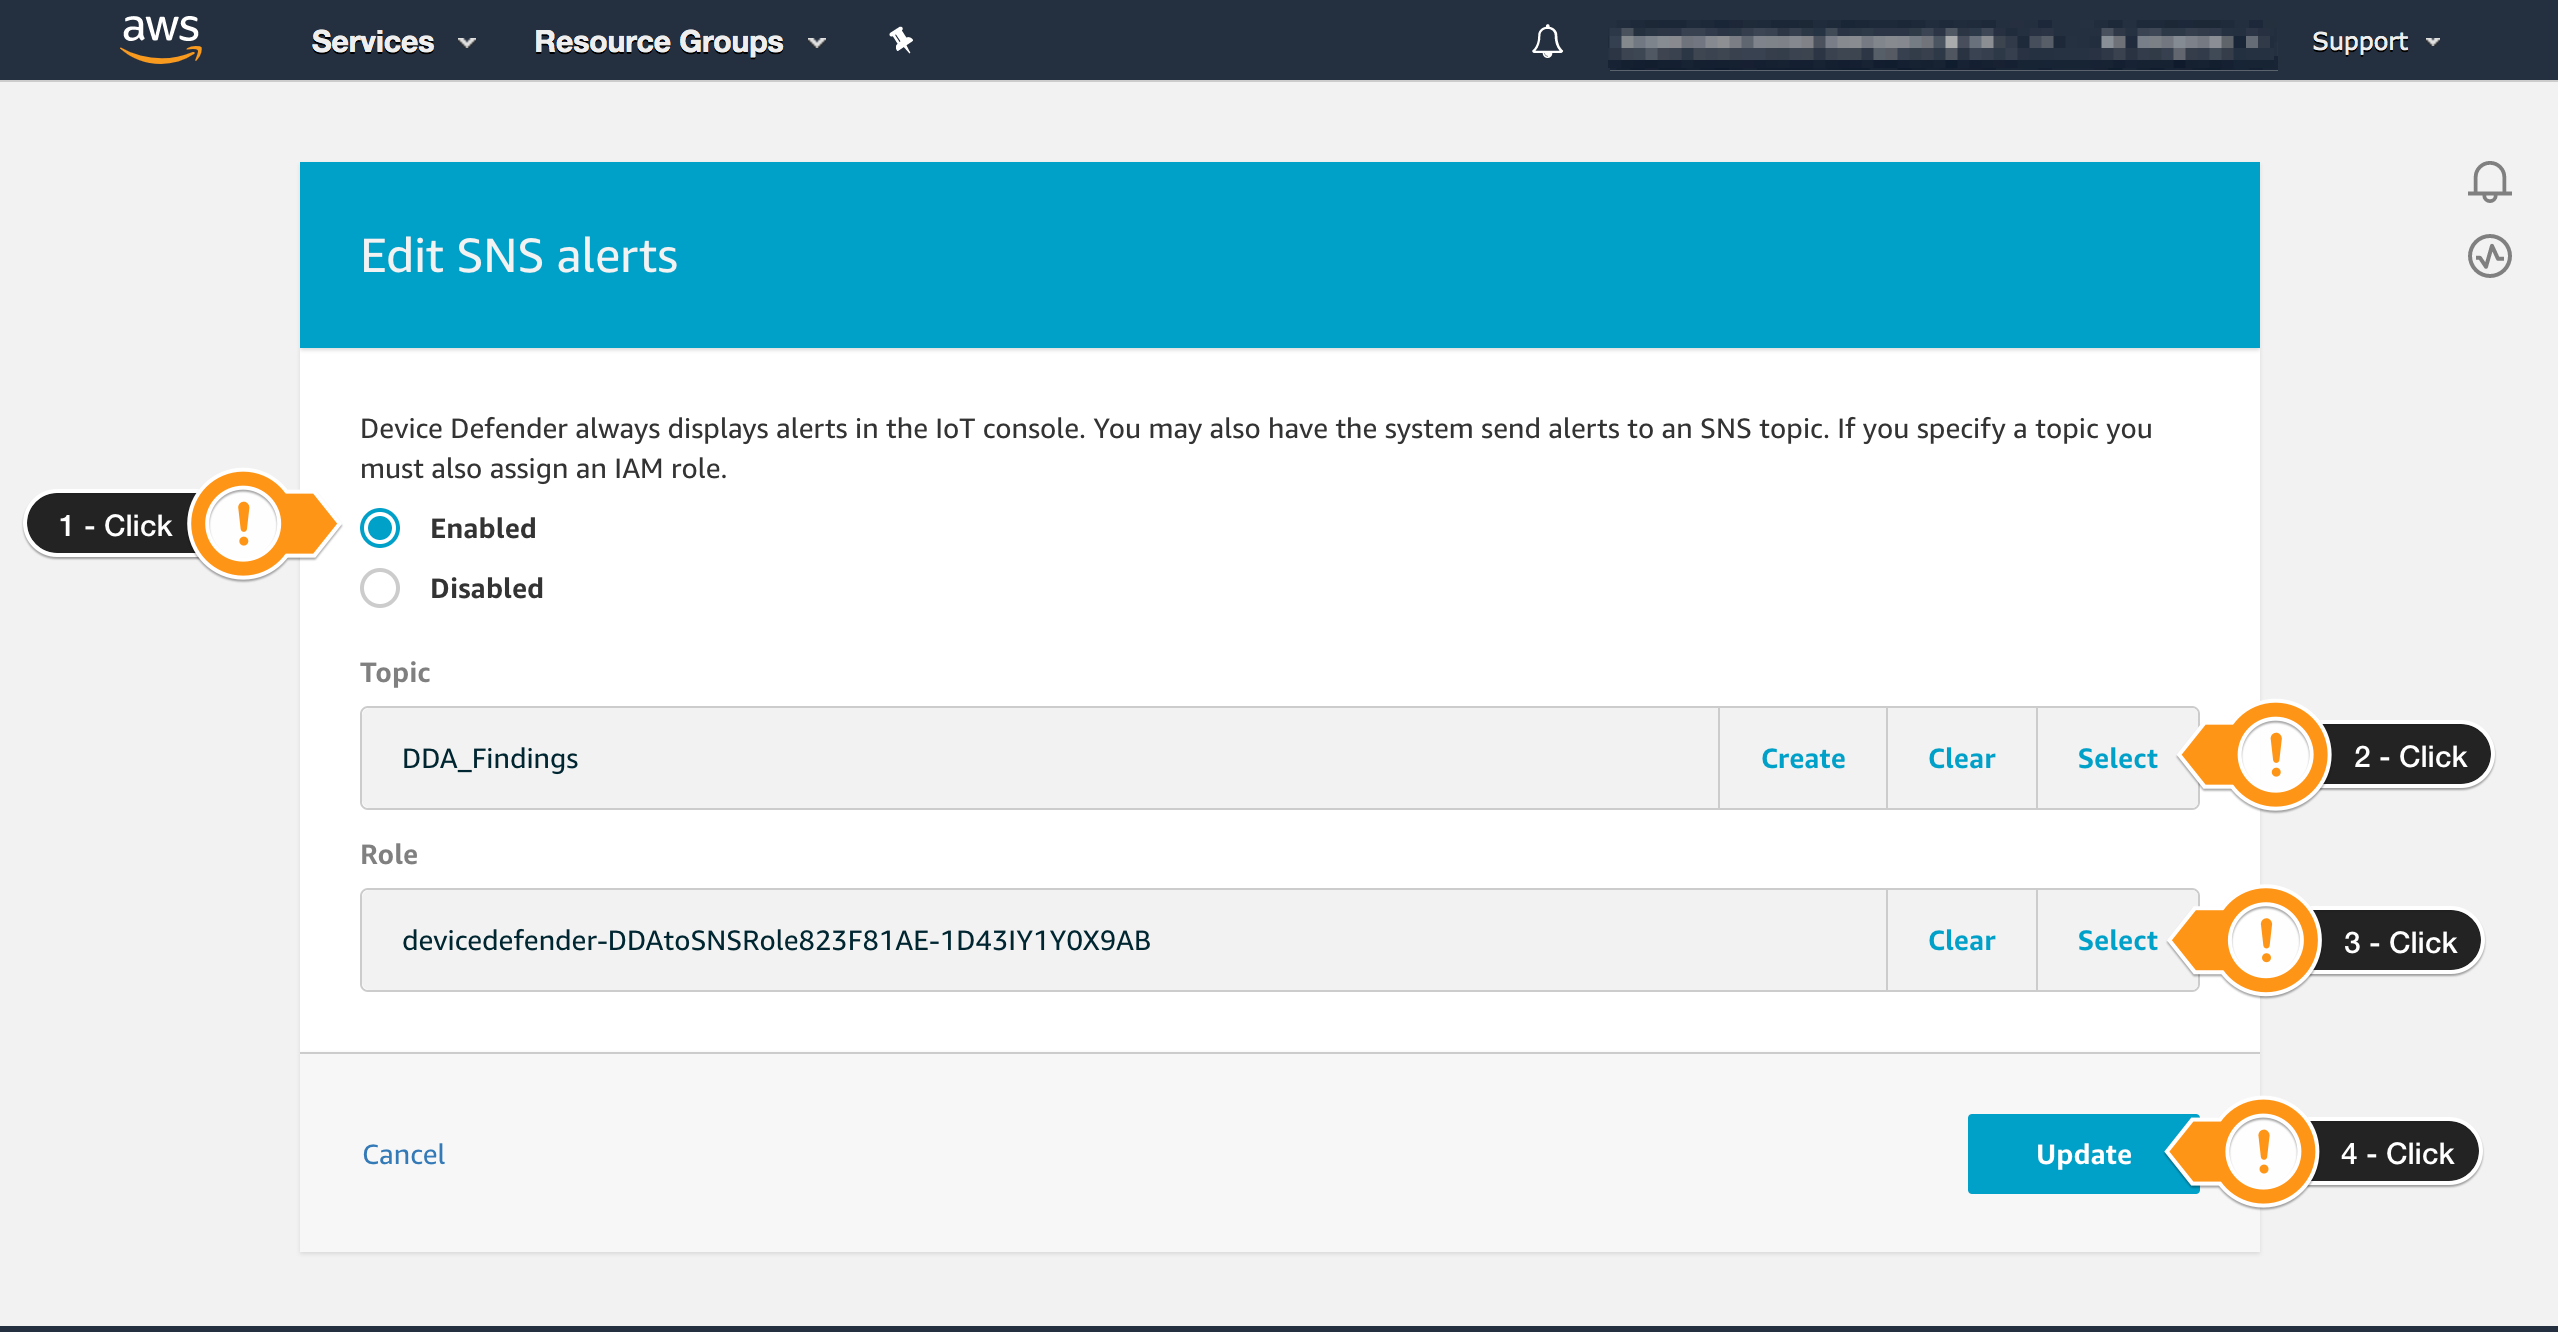
You have configured AWS IoT Device Defender Audit to send SNS messages to the specific Topic.
Understanding the SNS Event Generated by AWS IoT Device Defender
Once configured, AWS IoT Device Defender will run an Audit on the scheduled frequency and send Findings to the SNS topic you have configured. SNS will forward the message the Lambda mitigation function adding an envelope with Metadata such as EventVersion, SignatureVersion, Timestamp as showed on the example below.
{
  "Records": [
    {
      "EventVersion": "1.0",
      "EventSubscriptionArn": "arn:aws:sns:us-east-1:xxxxxxxxxxxx:DevDefenderAudit:152befa1-d830-4ccc-9bc7-5f790d6273db",
      "EventSource": "aws:sns",
      "Sns": {
        "SignatureVersion": "1",
        "Timestamp": "2019-10-25T14:19:33.294Z",
        "Signature": "pT0gOsvH/3SR9njmno+m2iv9jt4D1BNnkASEtt0On90KD6sI5m9LuZPRvfwZPRuBb0M9mE5IKJYaMW1GUU28+Sr50YfKpJnpQ8HBA38lU/2eQ/PKiUal4ATXX3C3EilOYo5kLZHiIhn1wzocwJhnlgZnQUTHBLvcBiCIYbx2MnfJm2cJWy7NtExZMeNk/11PKHXqE71m7K/gDXfU6SvJr1iRTv5hQs3QLhO/qUrB9k46V1iuthzU0lqVL4l161s7kAxSmGccMvkWqY2Sa+OP+qn2POGUR9nMm7ev3HPz84qNv4oYddl8y0V+xXCF61bk5IY7Hv+DUW4zbIMI7NYo8g==",
        "SigningCertUrl": "https://sns.us-east-1.amazonaws.com/
        SimpleNotificationService-6aad65c2f9911b05cd53efda11f913f9.pem",
        "MessageId": "e98d6ec4-a3b9-5e3e-a0c5-38e9a50cc829",
        "Message": "{\"accountId\":\"xxxxxxxxxxxx\",\"taskId\":\"7aa53579303b594f9bcb76082688a5de\",\"taskStatus\":\"COMPLETED\",\"taskType\":\"ON_DEMAND_AUDIT_TASK\",\"failedChecksCount\":0,\"canceledChecksCount\":0,\"nonCompliantChecksCount\":1,\"compliantChecksCount\":0,\"totalChecksCount\":1,\"taskStartTime\":1572013171897,\"auditDetails\":[{\"checkName\":\"IOT_POLICY_OVERLY_PERMISSIVE_CHECK\",\"checkRunStatus\":\"COMPLETED_NON_COMPLIANT\",\"nonCompliantResourcesCount\":2,\"totalResourcesCount\":5}]}",
        "MessageAttributes": {},
        "Type": "Notification",
        "UnsubscribeUrl": "https://sns.us-east-1.amazonaws.com/?Action=Unsubscribe&SubscriptionArn=arn:aws:sns:us-east-1:xxxxxxxxxxxx:DevDefenderAudit:152befa1-d830-4ccc-9bc7-5f790d6273db",
        "TopicArn": "arn:aws:sns:us-east-1:xxxxxxxxxxxx:DevDefenderAudit",
        "Subject": null
      }
    }
  ]
}
The relevant information is at ['Records'][0]['Sns']['Message'] and you can get it with the following sample code.
    ...
    message = event['Records'][0]['Sns']['Message']
    print("From SNS: " + message)
    ...
This is an example of a IOT_POLICY_OVERLY_PERMISSIVE_CHECK message.
{
    "accountId": "xxxxxxxxxxxx",
    "taskId": "7aa53579303b594f9bcb76082688a5de",
    "taskStatus": "COMPLETED",
    "taskType": "ON_DEMAND_AUDIT_TASK",
    "failedChecksCount": 0,
    "canceledChecksCount": 0,
    "nonCompliantChecksCount": 1,
    "compliantChecksCount": 0,
    "totalChecksCount": 1,
    "taskStartTime": 1572013171897,
    "auditDetails": [
        {
            "checkName": "IOT_POLICY_OVERLY_PERMISSIVE_CHECK",
            "checkRunStatus": "COMPLETED_NON_COMPLIANT",
            "nonCompliantResourcesCount": 2,
            "totalResourcesCount": 5
        }
    ]
}
So now that you know how to get the Findings (checkName and status) from AWS IoT Device Defender, you can automate the remediation actions.
Understanding the AWS Lambda Function
The Lambda function receives an SNS message, extracts the envelope, and gets the audit taskId for querying the findings details later.
    ...
    msg = json.loads(event['Message'])
    task_id = msg['taskId']
    ...
Then it determines whether the results contain a noncompliant check.
    ...
    for audit in msg['auditDetails']:

        if audit['checkRunStatus'] != "COMPLETED_COMPLIANT":
            logger.info("ERROR: {}".format(audit['checkName']))
    ...
The function processes only overly permissive policy findings (IOT_POLICY_OVERLY_PERMISSIVE_CHECK), but you can add other handlers to different issues.
    ...
    if audit['checkName'] == "IOT_POLICY_OVERLY_PERMISSIVE_CHECK":
        handle_overly_permissive_policy(task_id)
    else:
        handle_security_issue(task_id, issue_name)
    ...
To handle permissive issues, the function queries the AWS IoT Device Defender findings and iterates over them.
    ...
    r = iot.list_audit_findings(taskId=task_id, checkName='IOT_POLICY_OVERLY_PERMISSIVE_CHECK')

    for f in r['findings']:
        resource = f['nonCompliantResource']
    ...
To avoid changing existing policies provisioned on the account, the sample code acts only on the policies created with a specific prefix, in this case, WS_AUDIT_. Additionally, the permissions attached to the Lambda function allow updates only on the permissive AWS IoT policy.
    ...
    if policy_name.startswith(TARGET_POLICY_NAME_PREFIX):
        fix_overly_permissive_policy(policy_name, policy_version)
    ...
It will change the current permissive policy to the following pre-defined restrictive policy, which allows a device to manipulate only its own shadow.
{
    "Version": "2012-10-17",
    "Statement": [
        {
            "Sid": "ConnectUsingClientId",
            "Effect": "Allow",
            "Action": "iot:Connect",
            "Resource": "arn:aws:iot:*:*:client/${iot:Connection.Thing.ThingName}",
            "Condition": {
                "Bool": { "iot:Connection.Thing.IsAttached": "true" }
            }
        },
        {
            "Sid": "UpdateAndQueryOwnShadow",
            "Effect": "Allow",
            "Action": [
                "iot:Publish"
            ],
            "Resource": [
                "arn:aws:iot:*:*:topic/$aws/things/${iot:Connection.Thing.ThingName}/shadow/update",
                "arn:aws:iot:*:*:topic/$aws/things/${iot:Connection.Thing.ThingName}/shadow/get"
            ]
        },
        {
            "Sid": "ReceiveShadowChanges",
            "Effect": "Allow",
            "Action": [
                "iot:Subscribe",
                "iot:Receive"
            ],
            "Resource": [
                "arn:aws:iot:*:*:topicfilter/$aws/things/${iot:Connection.Thing.ThingName}/shadow/*"
            ]
        }
    ]
}
The function fix_overly_permissive_policy() contains the code to fix this issue. It handles a few different situations, but the main idea is to delete the offending policy, and replace it with a new default one with restrictive permissions.
def fix_overly_permissive_policy(policy_name, policy_version):
    ...
    r = iot.delete_policy_version(
        policyName=policy_name,
        policyVersionId=policy_version
    )
    ...
    r = iot.create_policy_version(
        policyName=policy_name,
        policyDocument=RESTRICTIVE_DEFAULT_POLICY,
        setAsDefault=True
    )
    ...
This sample function will work for a few issues. If you need to address many issues at a time, you can decouple the results analysis from the remediation using, for example, Amazon SQS.
Understanding the Function Permissions and Role
You are concerned with the security of the Role solution and you know you should use the Least Privilege Principle to create the permissions attached to the Role used by your Lambda function.
The lambda function requires some basic permissions for creating Log Groups, Streams and send data to Cloudwatch Logs. The following snippet describes a sample policy.
{
    "Version": "2012-10-17",
    "Statement": [
        {
            "Effect": "Allow",
            "Action": [
                "logs:CreateLogGroup",
                "logs:CreateLogStream",
                "logs:PutLogEvents"
            ],
            "Resource": "*"
        }
    ]
}
The lambda function also needs to execute a few operations related to the steps you saw on the previous session such as List Audit Tasks, Create Policy Version, Delete a Policy Version and Change the Default Policy Version. You can notice that the names of the methods on AWS IoT SDK usually have similar names to the permissions, so it should be easy to identify them. For example, iot.list_audit_findings() requires the permission iot:ListAuditFindings.
{
    "Version": "2012-10-17",
    "Statement": [
        {
            "Action": [
                "iot:DescribeAccountAuditConfiguration",
                "iot:DescribeAuditTask",
                "iot:ListAuditTasks",
                "iot:ListScheduledAudits",
                "iot:ListAuditFindings"
            ],
            "Resource": "*",
            "Effect": "Allow"
        },
        {
            "Action": [
                "iot:CreatePolicyVersion",
                "iot:DeletePolicyVersion",
                "iot:ListPolicyVersions",
                "iot:SetDefaultPolicyVersion"
            ],
            "Resource": "arn:aws:iot:*:*:policy/AUDIT_WS_*",
            "Effect": "Allow"
        },
        {
            "Action": [
                "s3:PutObject",
                "s3:GetObject"
            ],
            "Resource": "arn:aws:s3:::dreis-sandbox-temp/*",
            "Effect": "Allow"
        },
        {
            "Action": "iam:PassRole",
            "Resource": "arn:aws:iam::*:role/*",
            "Effect": "Allow"
        }
    ]
}
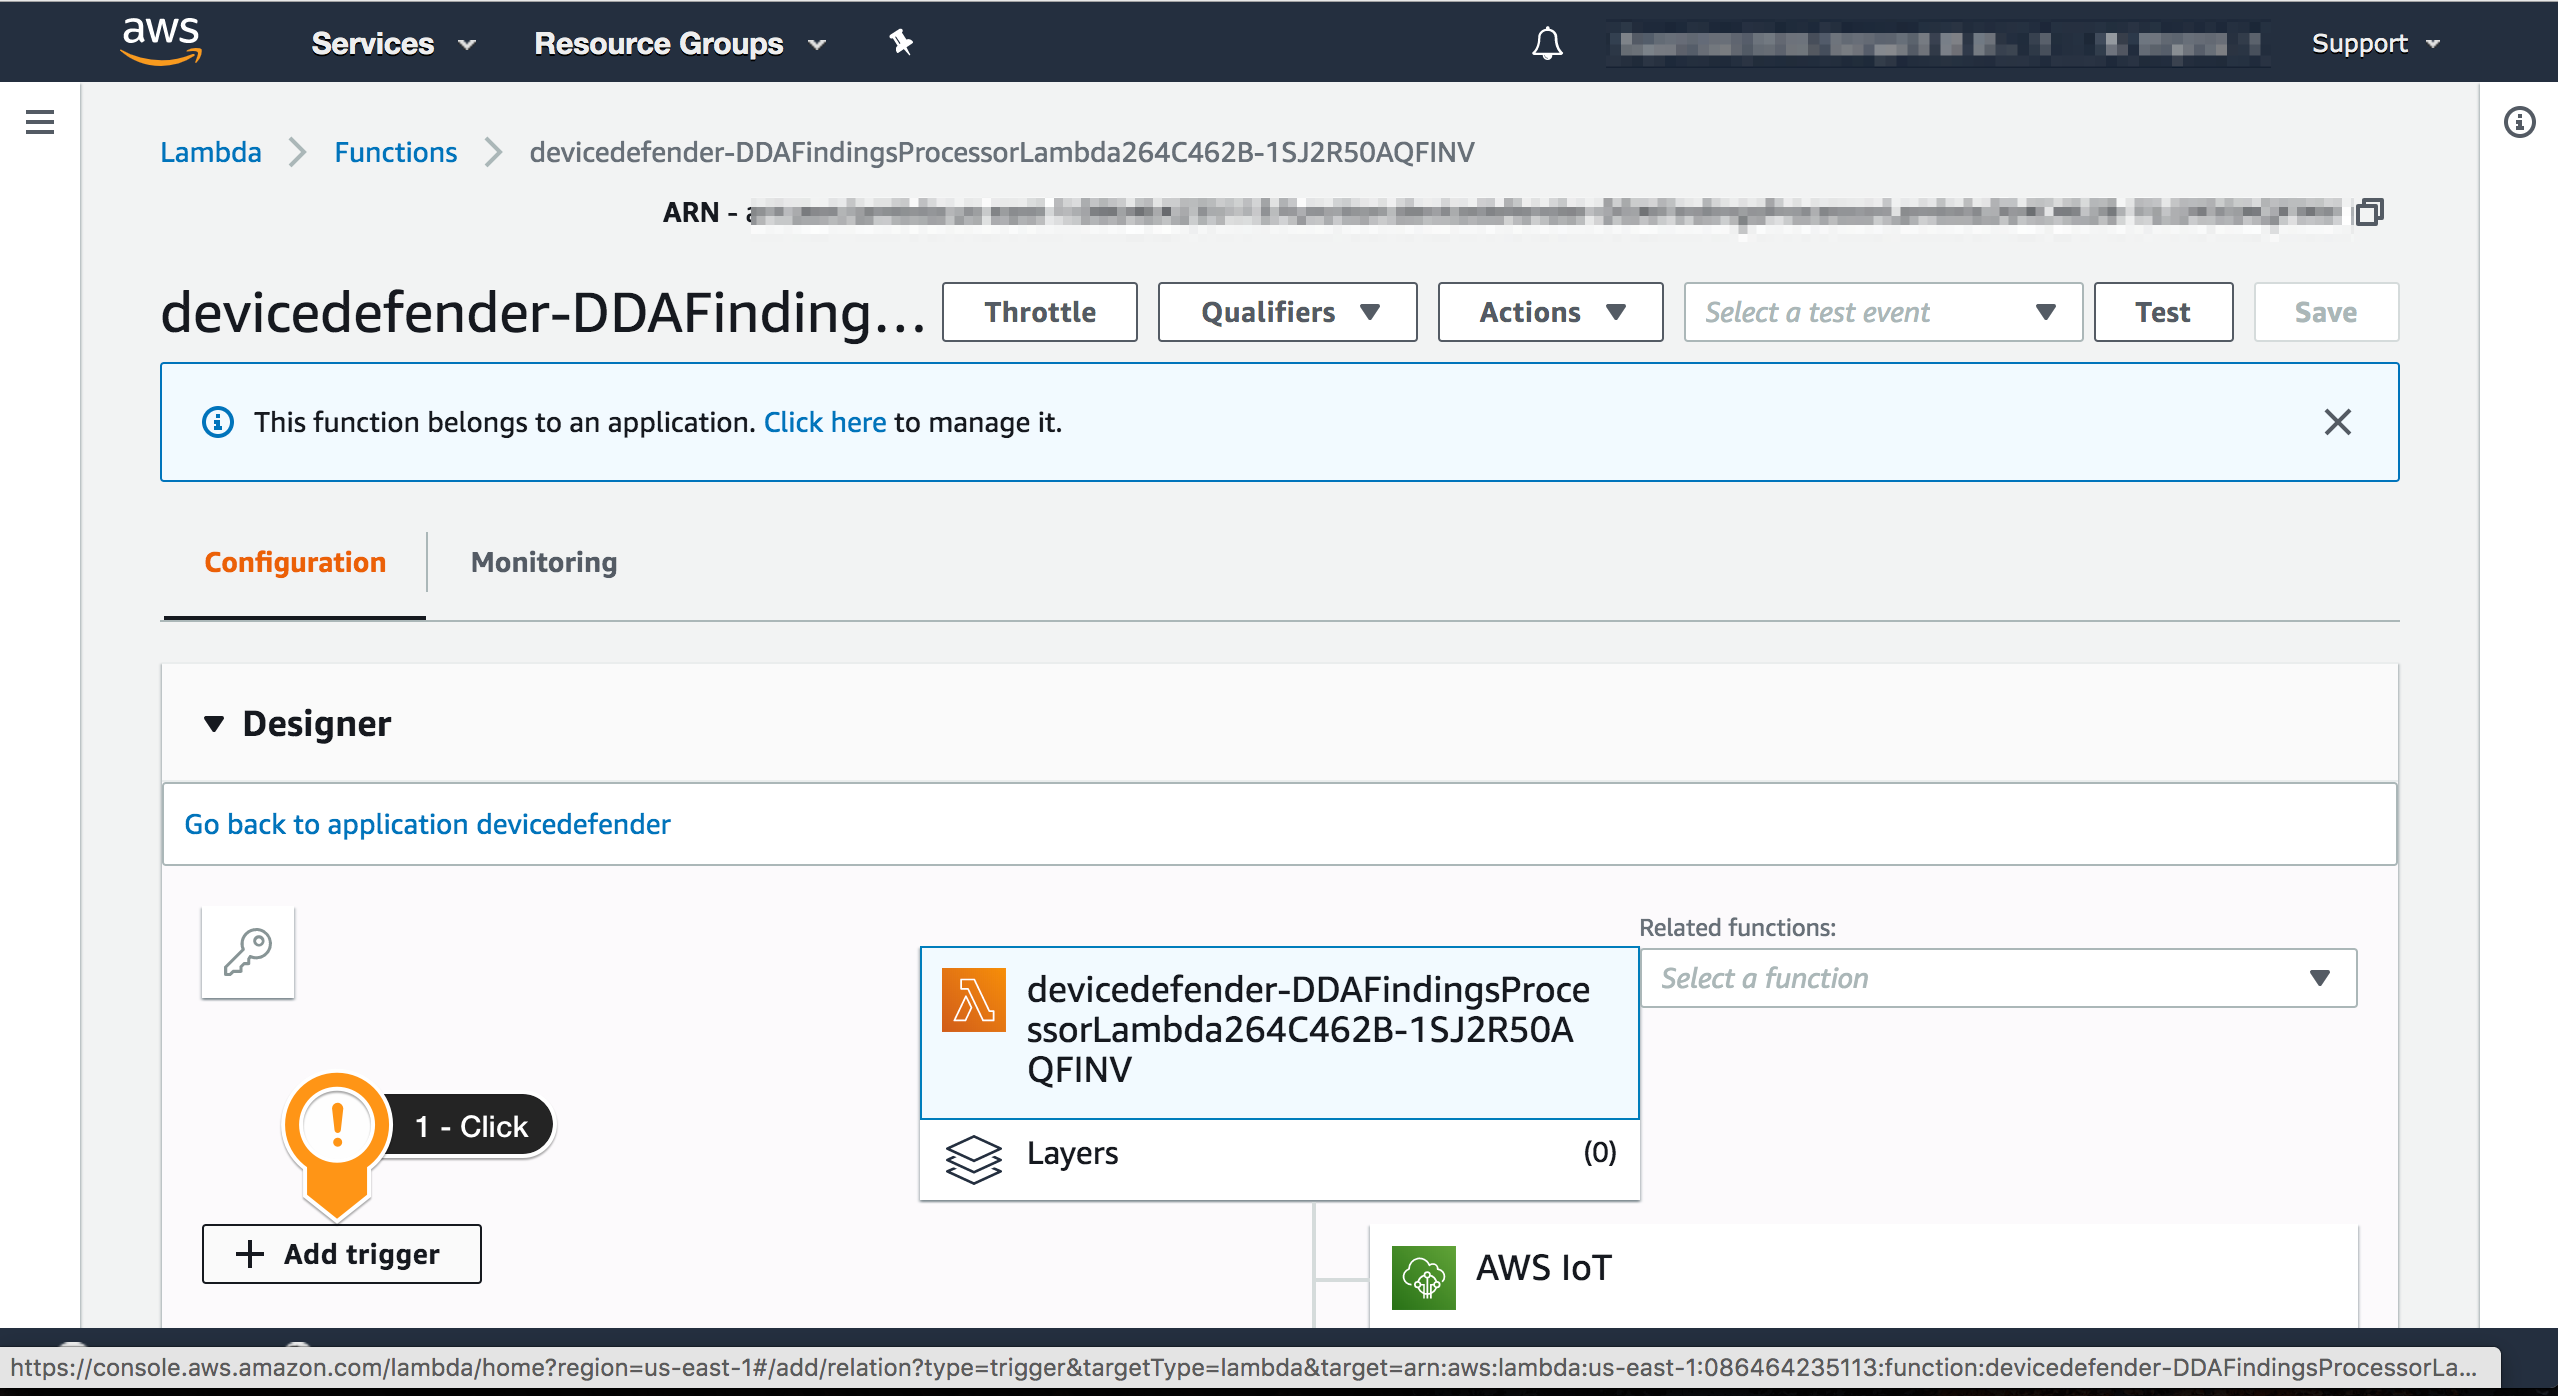
Configuring the AWS Lambda Function Trigger
You have configured AWS IoT Device Defender Audit to send events to SNS. Now, you need to configure the trigger which will execute the lambda function when events arrive on SNS.
- Open AWS Lambda console
- Choose the
DDAFindingsProcessorLambda Function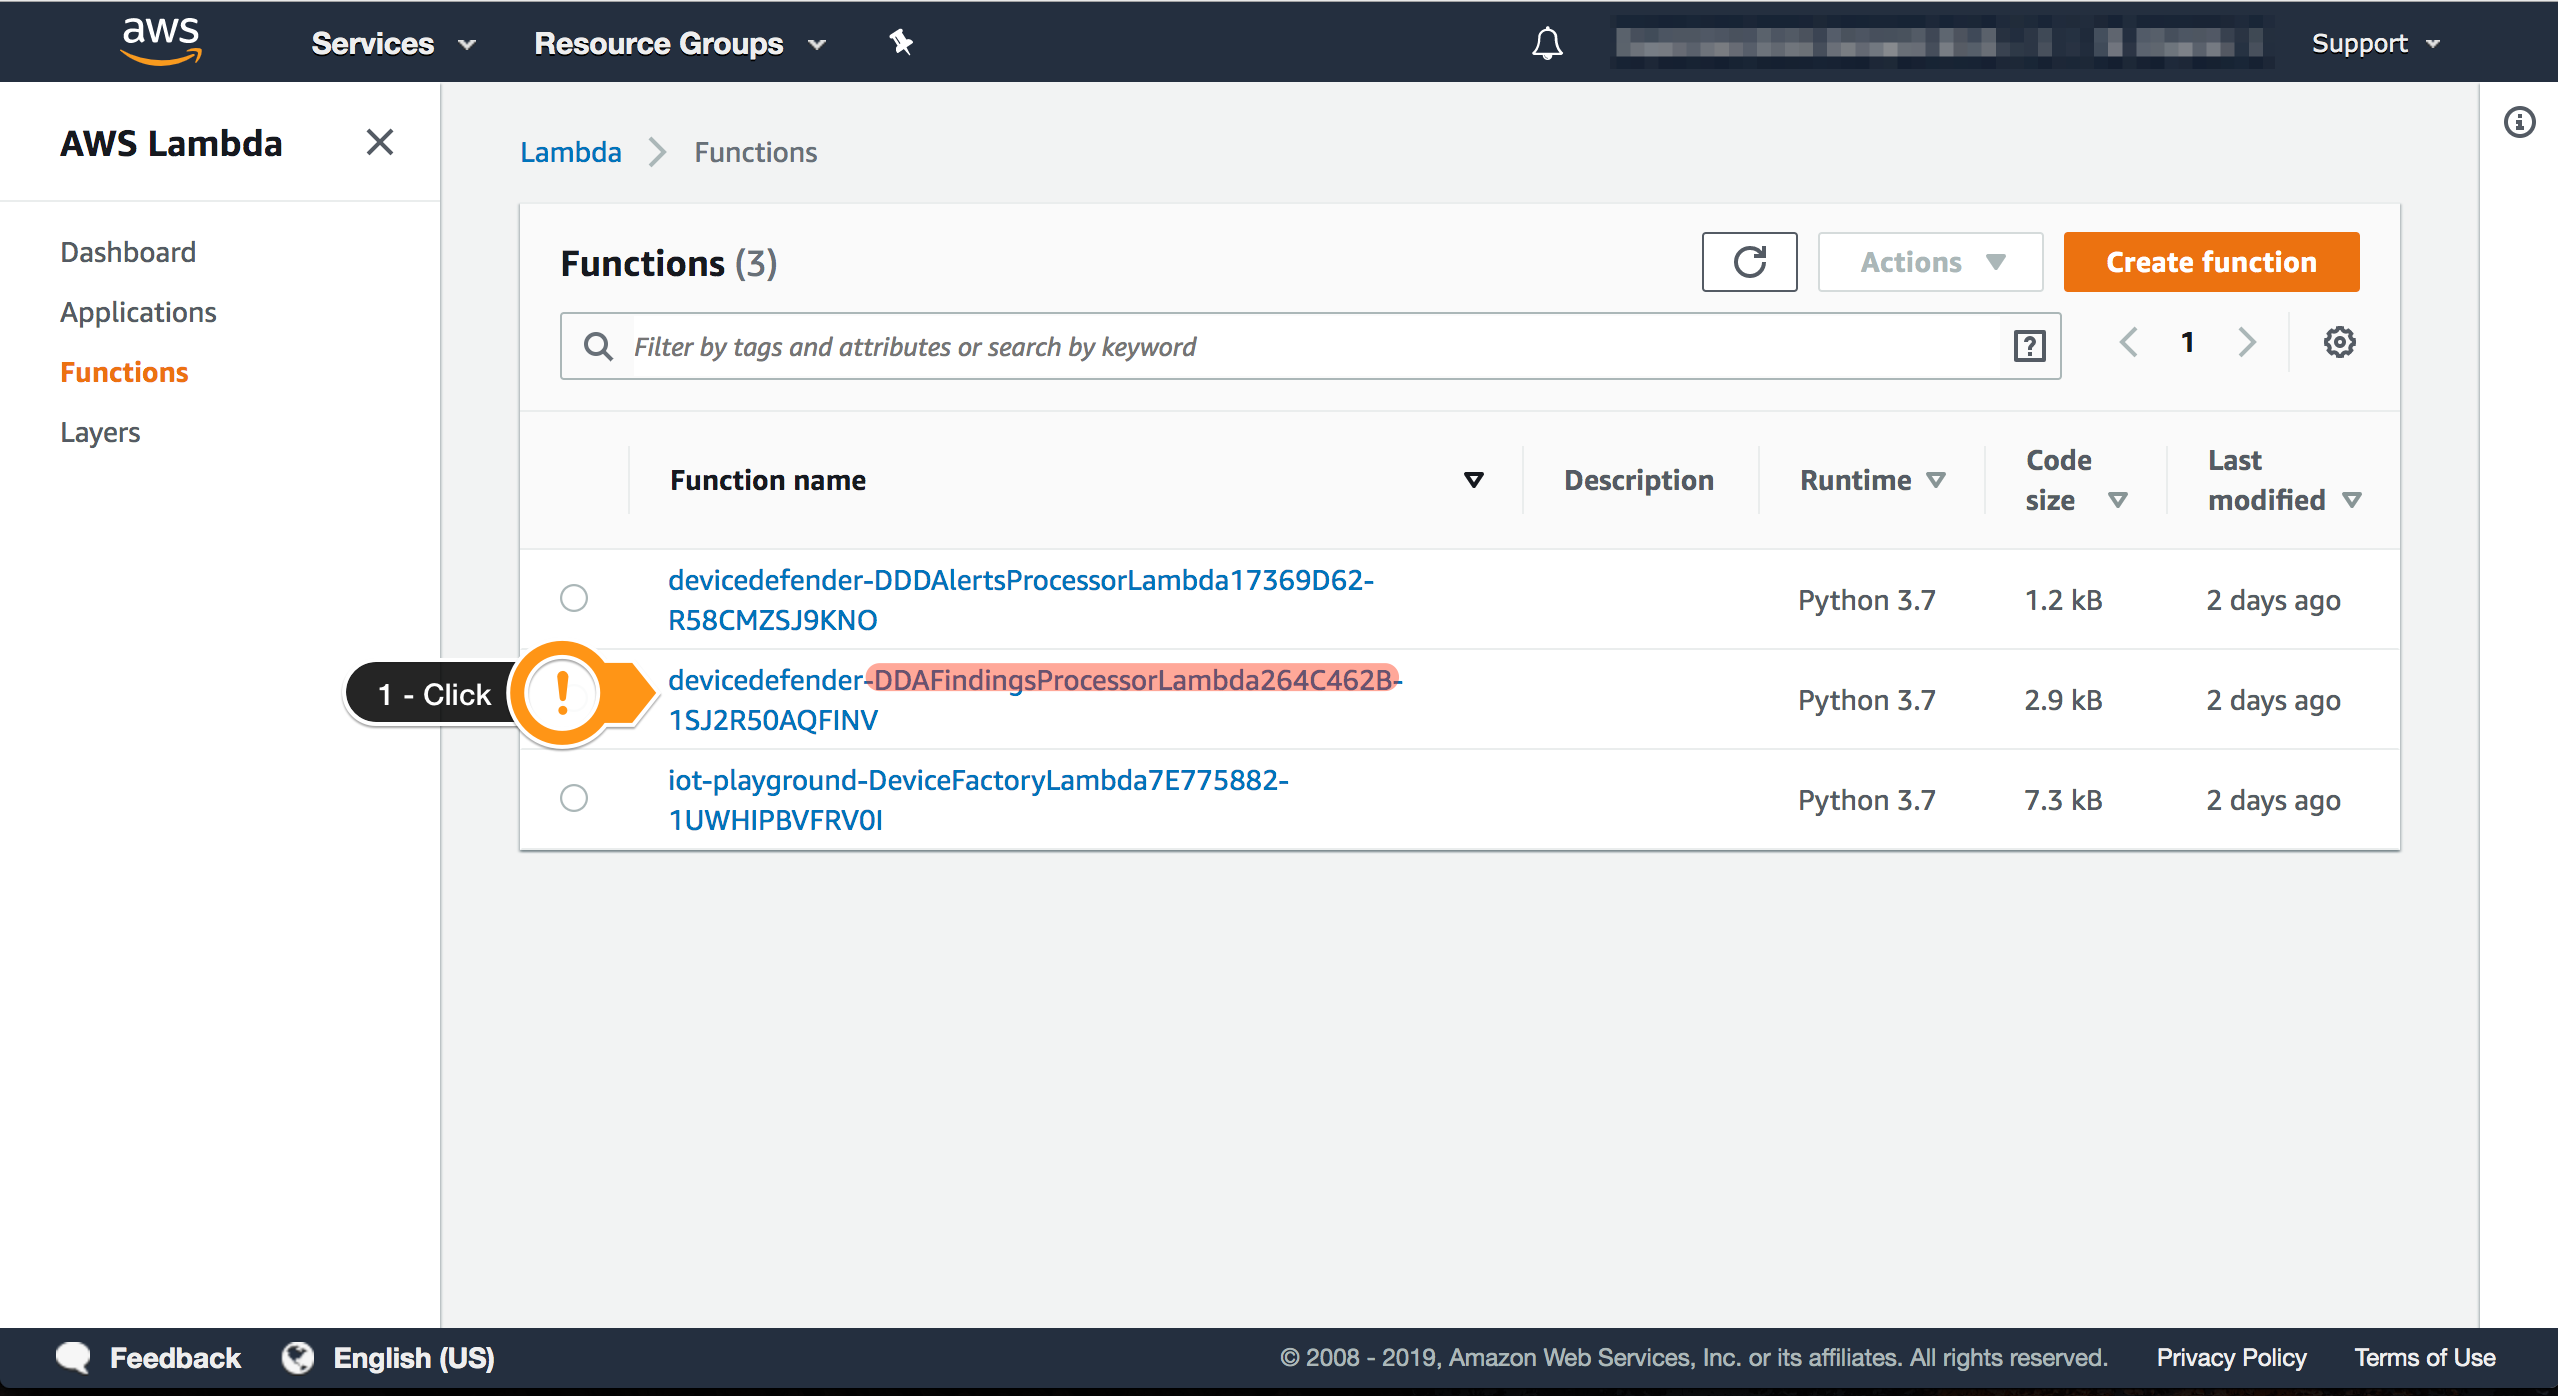
- Choose + Add trigger
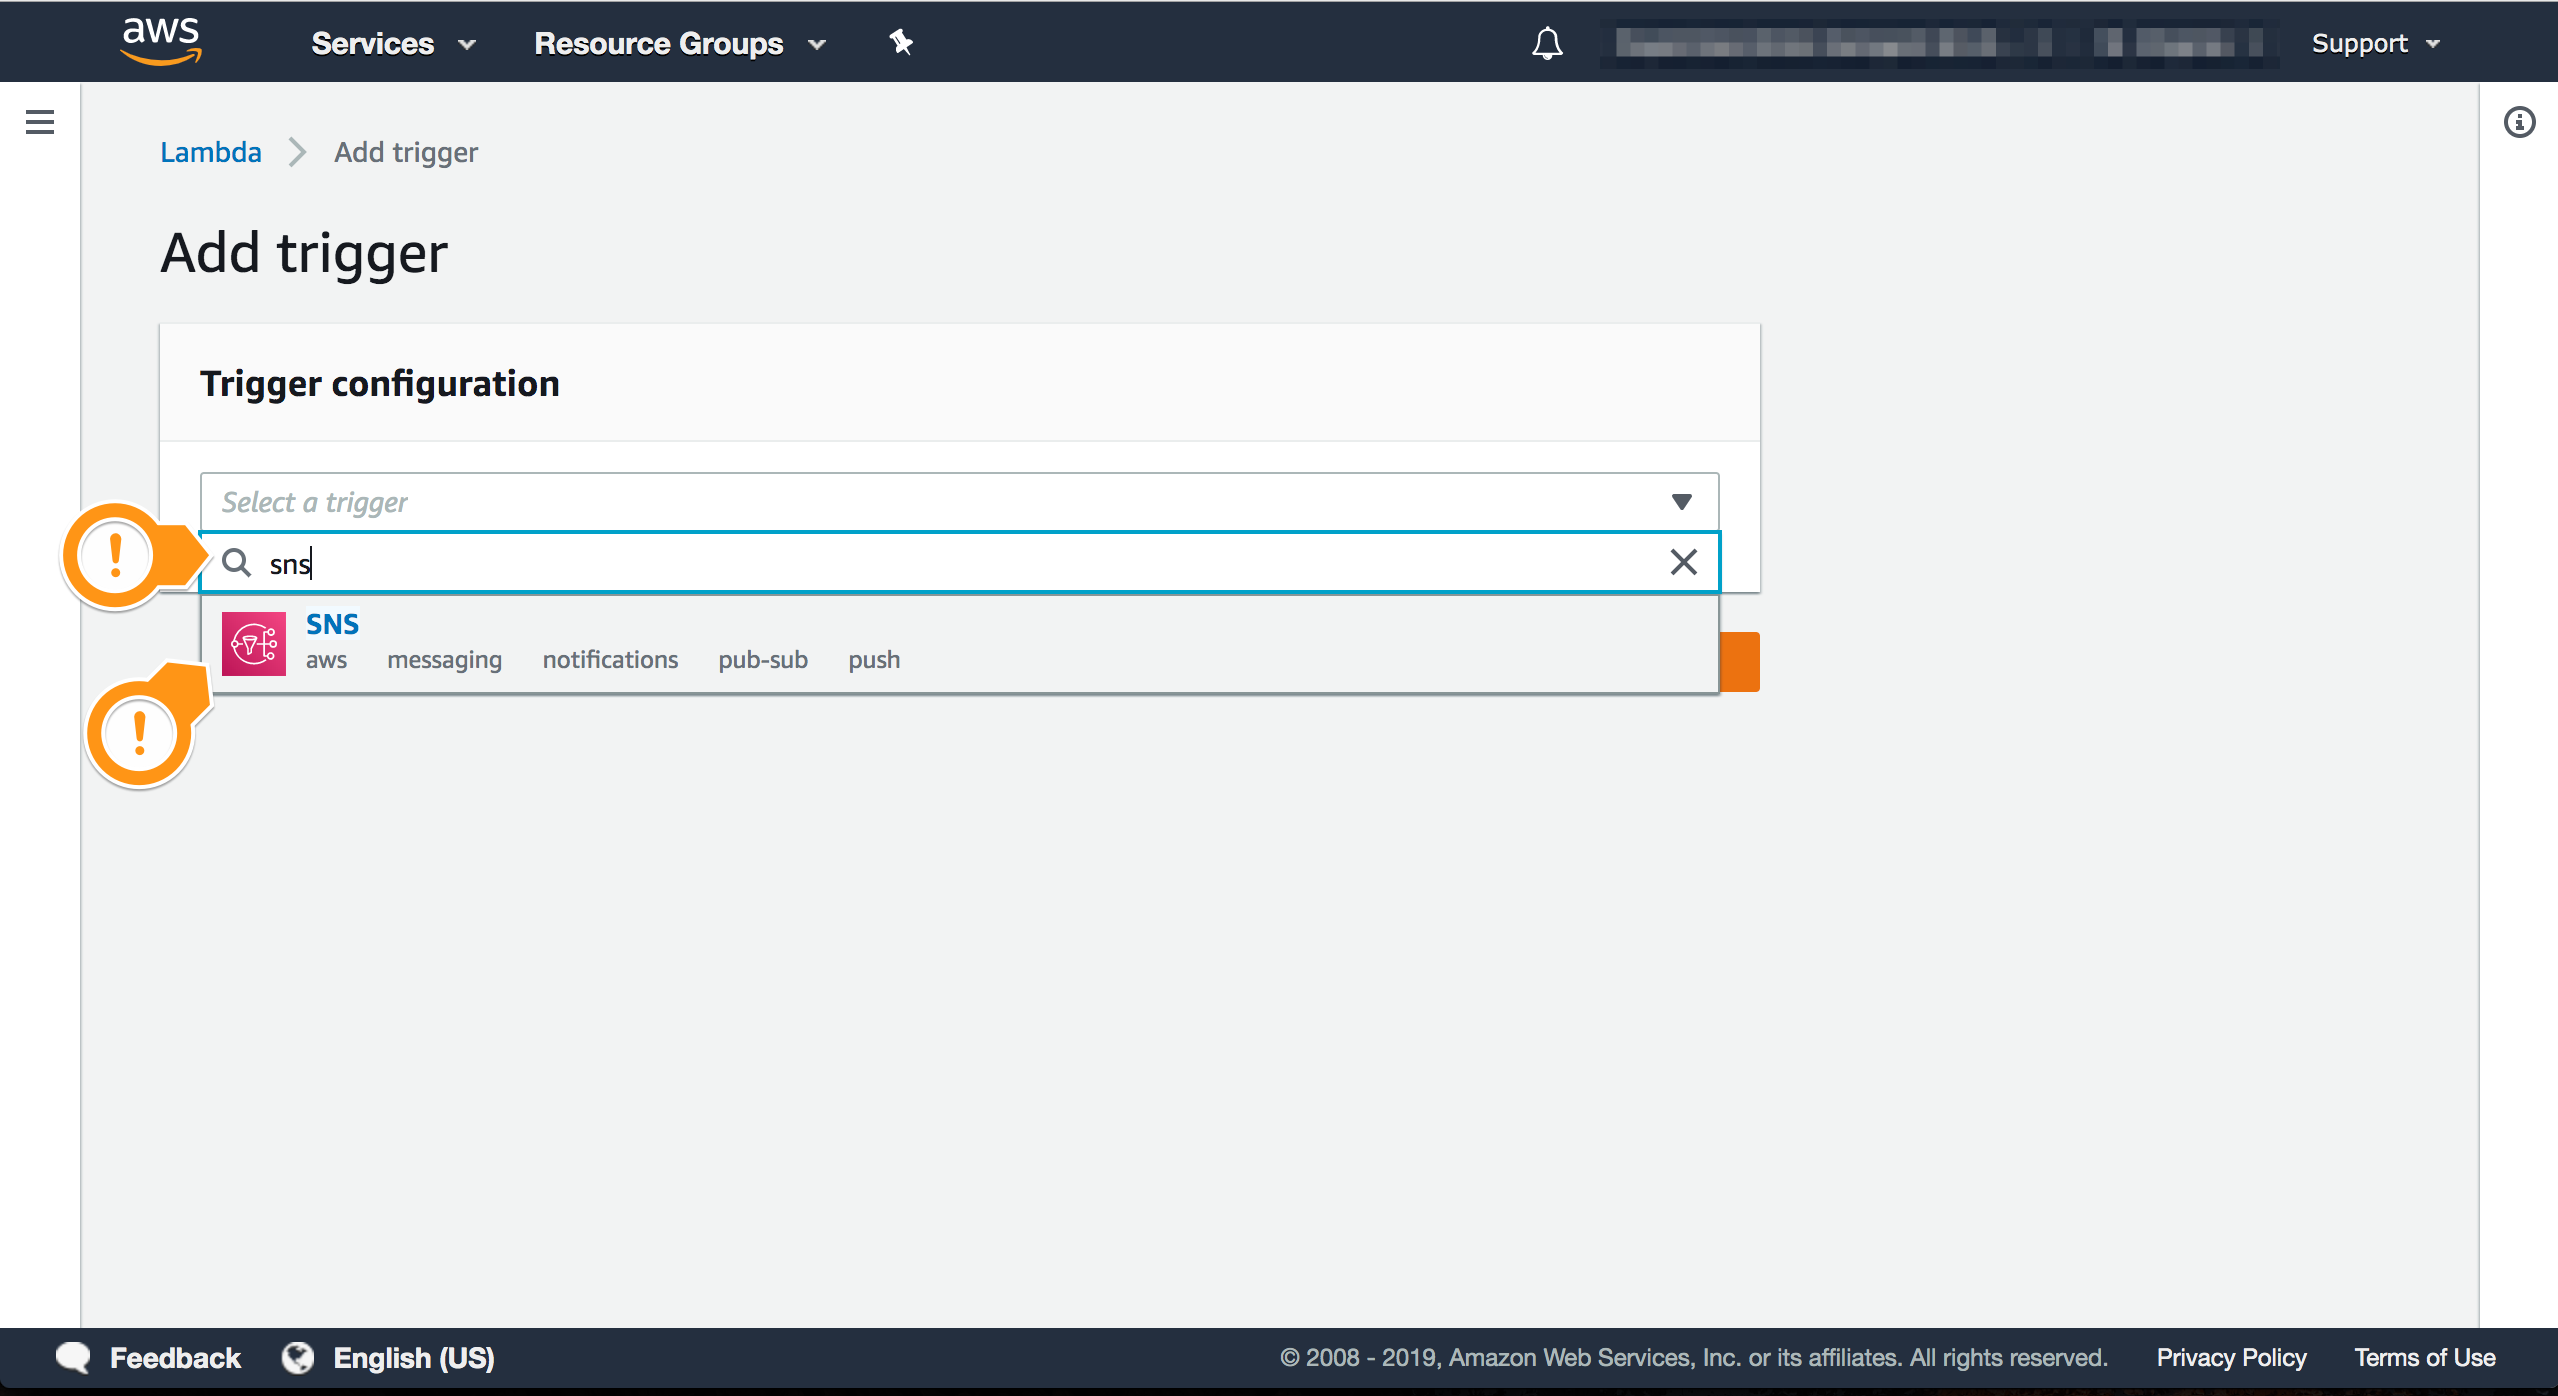
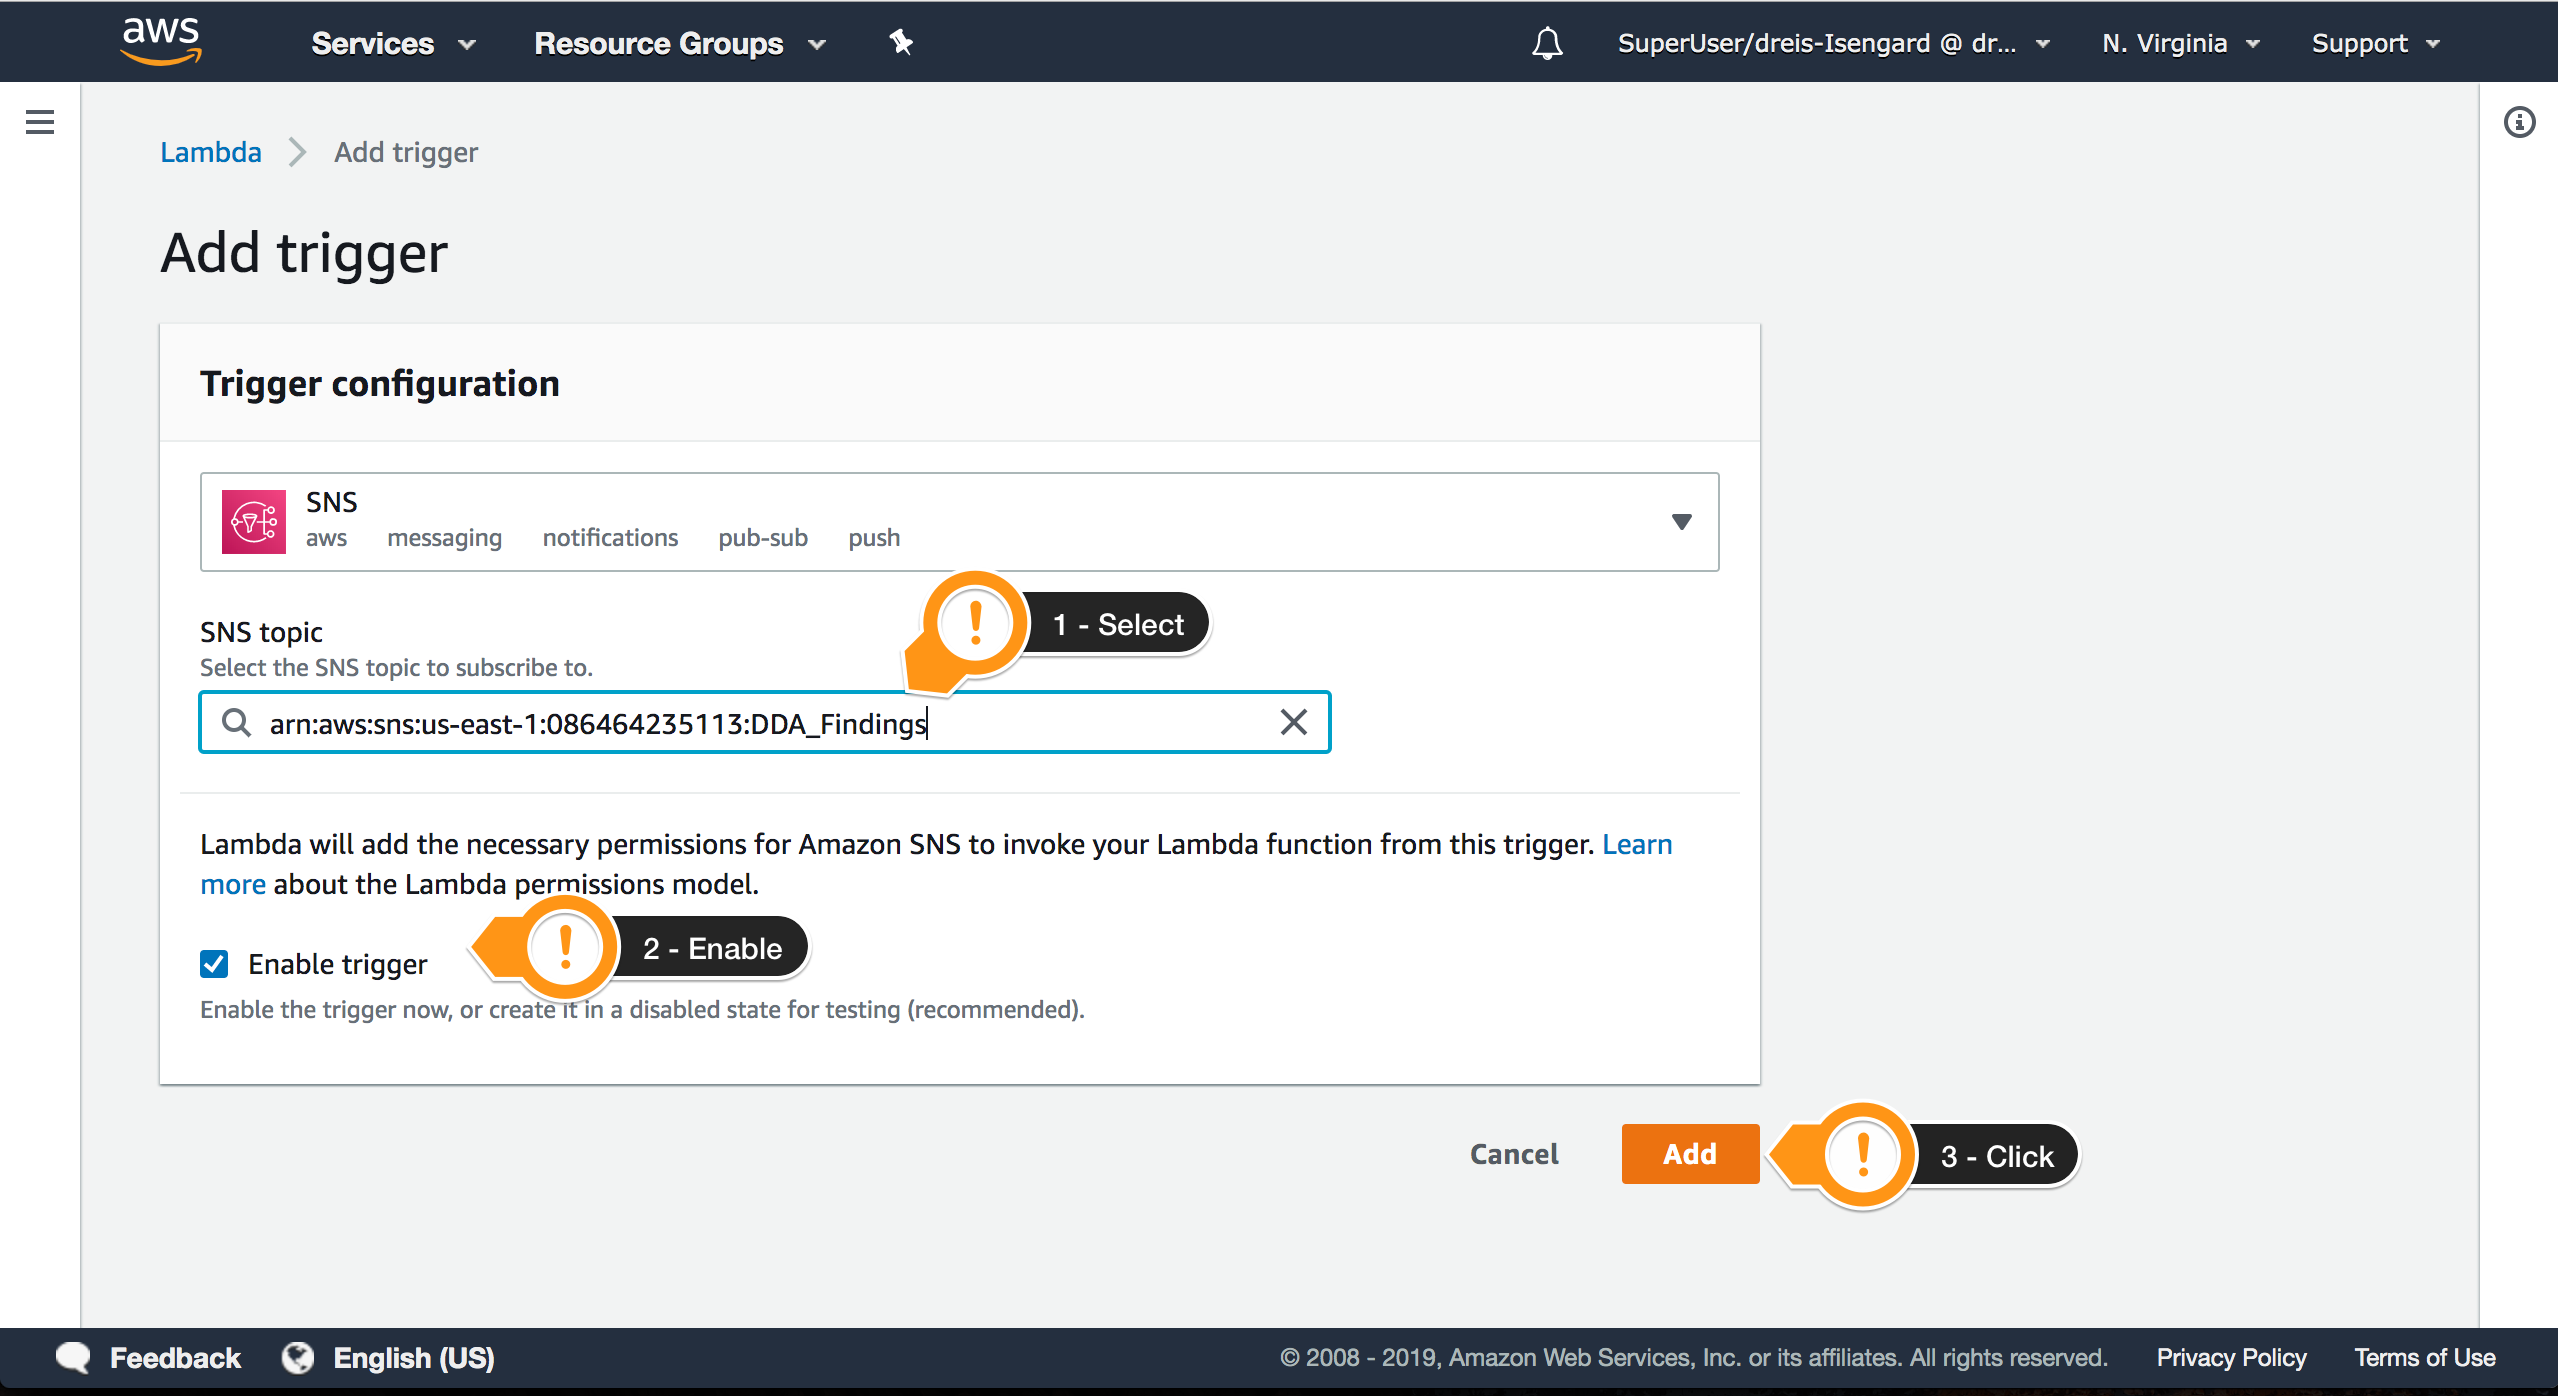
- For Trigger type
SNS - Choose SNS
- Locate the Topic with
DDA_Findings - Check if the trigger is enabled
- Choose Add
You have finished the configuration of the solution. Now it is time to test it!
Examining the Sample Permissive AWS IoT Policy
You have finished the setup and can check if it works as expected. You will create a permissive AWS IoT policy that will trigger AWS IoT Device Defender after running an audit. The JSON below shows the sample policy.
{
  "Version": "2012-10-17",
  "Statement": [
    {
      "Action": [
        "iot:Connect",
        "iot:Publish",
        "iot:Subscribe",
        "iot:Receive"
      ],
      "Resource": [
        "*"
      ],
      "Effect": "Allow"
    }
  ]
}
This policy doesn’t comply with the best practices because it has very broad permissions. For example, the actions aren’t constrained to specific resources. This allows a device using this policy to publish messages to any topic and potentially interfere with other devices. You can find more [information about the analysis performed by AWS IoT Device Defender here] (https://docs.aws.amazon.com/iot/latest/developerguide/device-defender-audit.html).
In a production environment, you should follow a least-privilege policy by default, that is, your device should have only the permissions required to complete its activities. Continuous auditing can help you detect and take action in the event a policy has been created that isn’t in line with best practices.
Creating a Sample Permissive AWS IoT Policy
- Open AWS IoT Console
- Choose Secure then Policies
- Choose Create
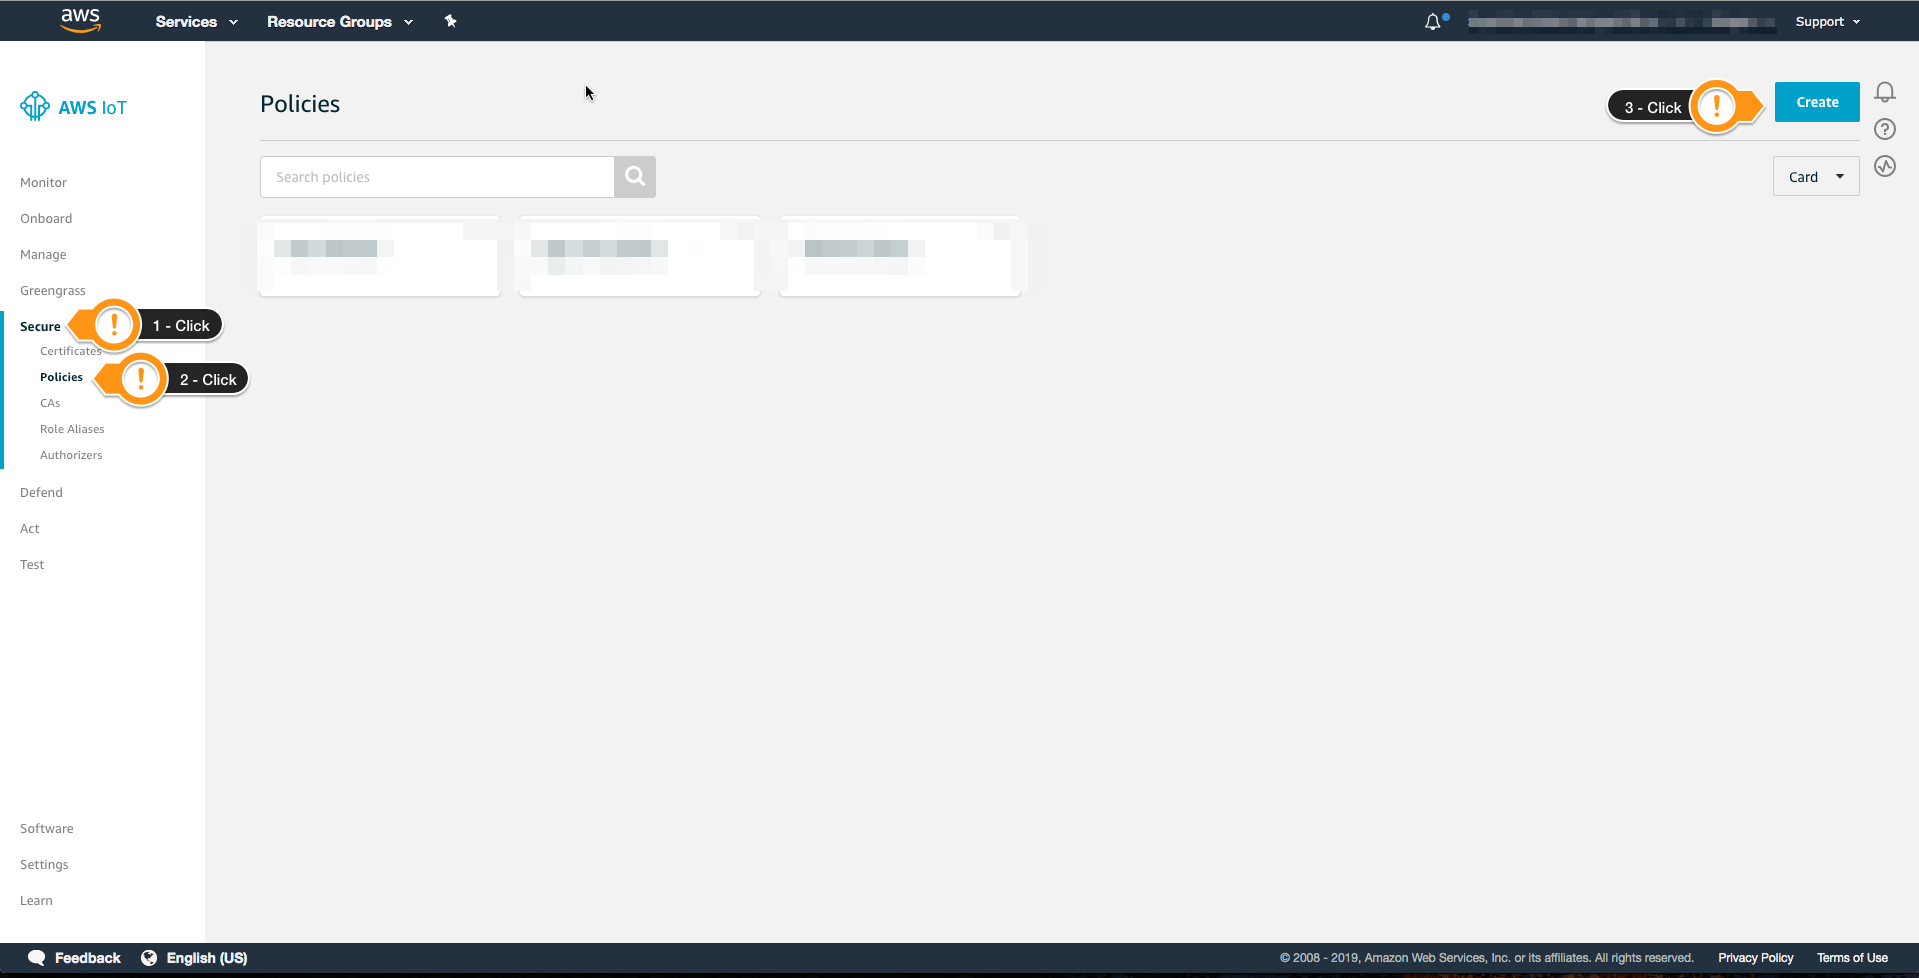
- For Name type
WS_AUDIT_PermissivePolicy - Choose Advanced mode
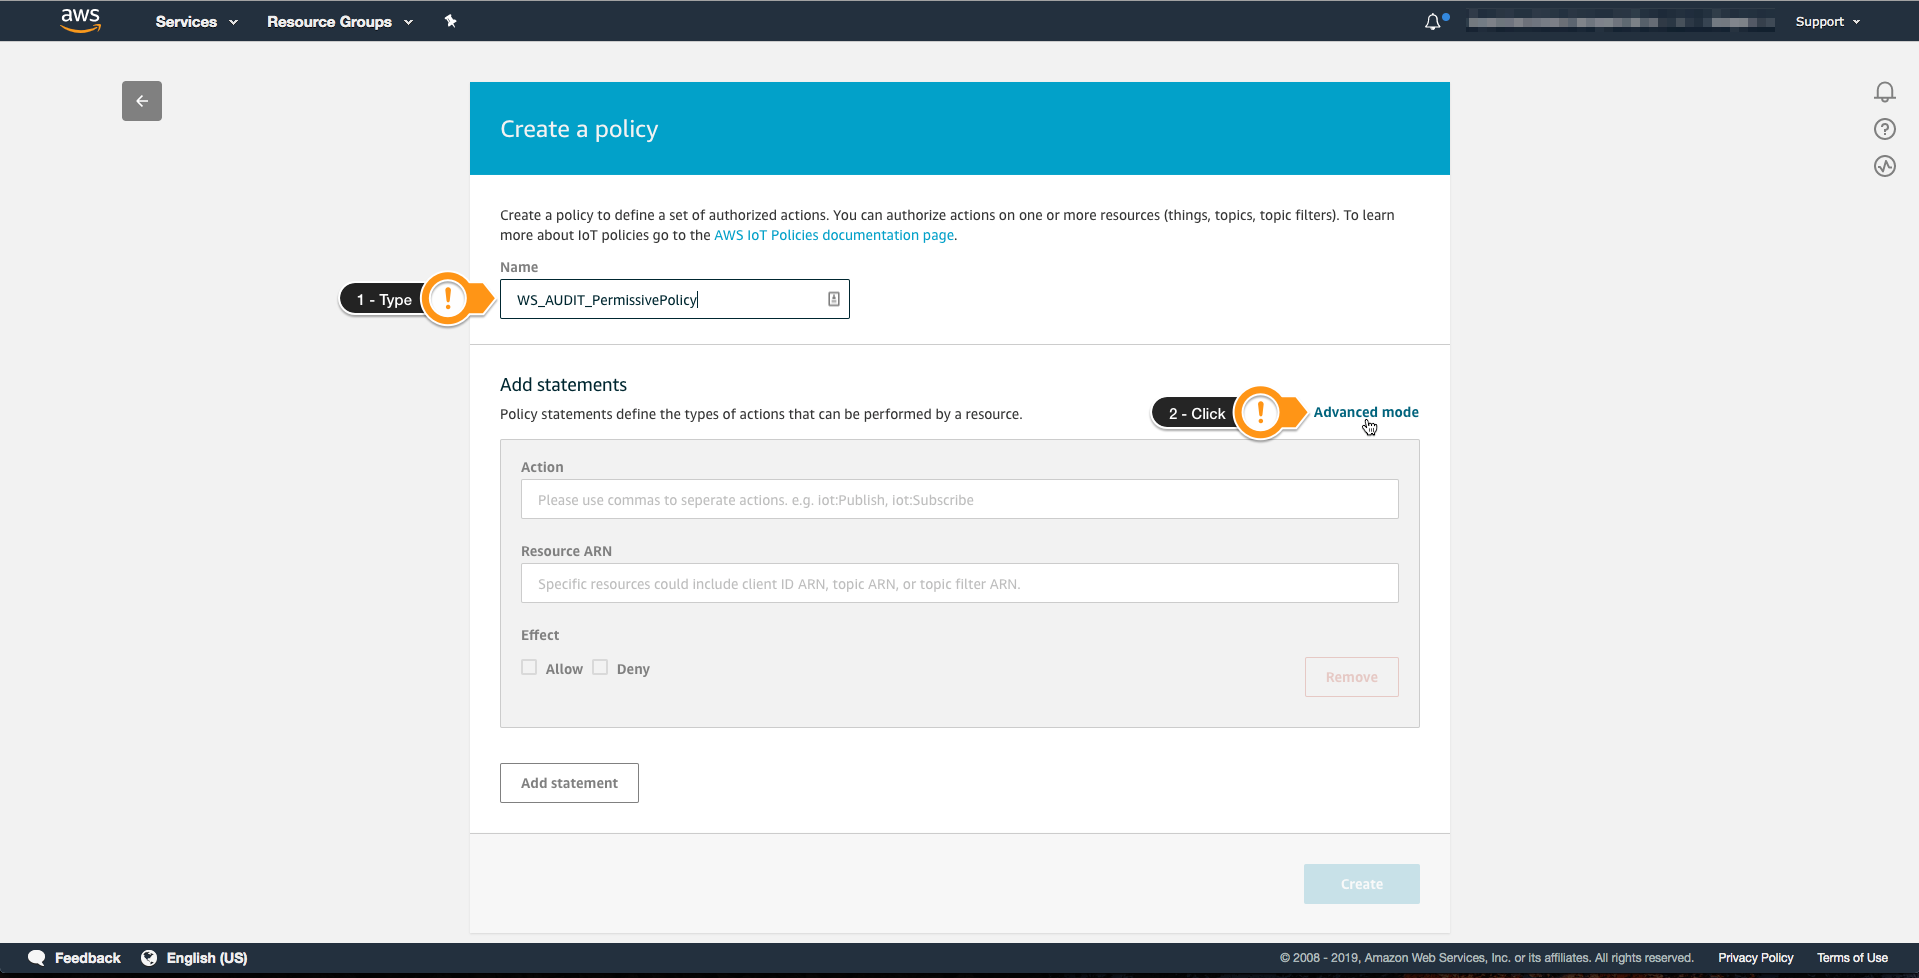
- Copy the Policy below and paste it on Add statements
{
  "Version": "2012-10-17",
  "Statement": [
    {
      "Action": [
        "iot:Connect",
        "iot:Publish",
        "iot:Subscribe",
        "iot:Receive"
      ],
      "Resource": [
        "*"
      ],
      "Effect": "Allow"
    }
  ]
}
- Choose Create
# Creating a permissive Policy
$ aws iot create-policy \
    --policy-name "WS_AUDIT_PermissivePolicy" \
    --policy-document "{\"Version\":\"2012-10-17\",\"Statement\":{\"Effect\":\"Allow\",\"Action\":[\"iot:Connect\", \"iot:Publish\",\"iot:Subscribe\",\"iot:Receive\"],\"Resource\":\"*\"}}"
Output example:
aws iot create-policy \
    --policy-name "WS_AUDIT_PermissivePolicy" \
    --policy-document "{\"Version\":\"2012-10-17\",\"Statement\":{\"Effect\":\"Allow\",\"Action\":[\"iot:Connect\", \"iot:Publish\",\"iot:Subscribe\",\"iot:Receive\"],\"Resource\":\"*\"}}"
Starting an On-Demand Audit
After creating a permissive policy, you will run an on-demand audit to check if the remediation strategy is working. Each completed audit task will trigger the Lambda function.
To complete this task, follow these steps:
- Open the AWS IoT Core console
- In the left navigation pane, choose Defend and then Audit
- Choose Schedules
- On the upper right, choose Create
- Select only IoT policies overly permissive. You can use AWS IoT Device Defender to create separated schedules for each type of check. For example, a daily audit for Device certificate shared and a weekly audit for CA Certificates expiring
- Scroll to the Set Schedule session.
- Choose Run audit now (once).
- Choose Create to start the audit.
Output example:
$ aws iot start-on-demand-audit-task \
    --target-check-names IOT_POLICY_OVERLY_PERMISSIVE_CHECK
{
    "taskId": "660b1f3a889a894f8877958f1550f6b7"
}
Checking the Audit Progress
Depending on the number of devices and checks selected, the Audit execution can take more time to finish. You can follow the progress using the console or the APIs.
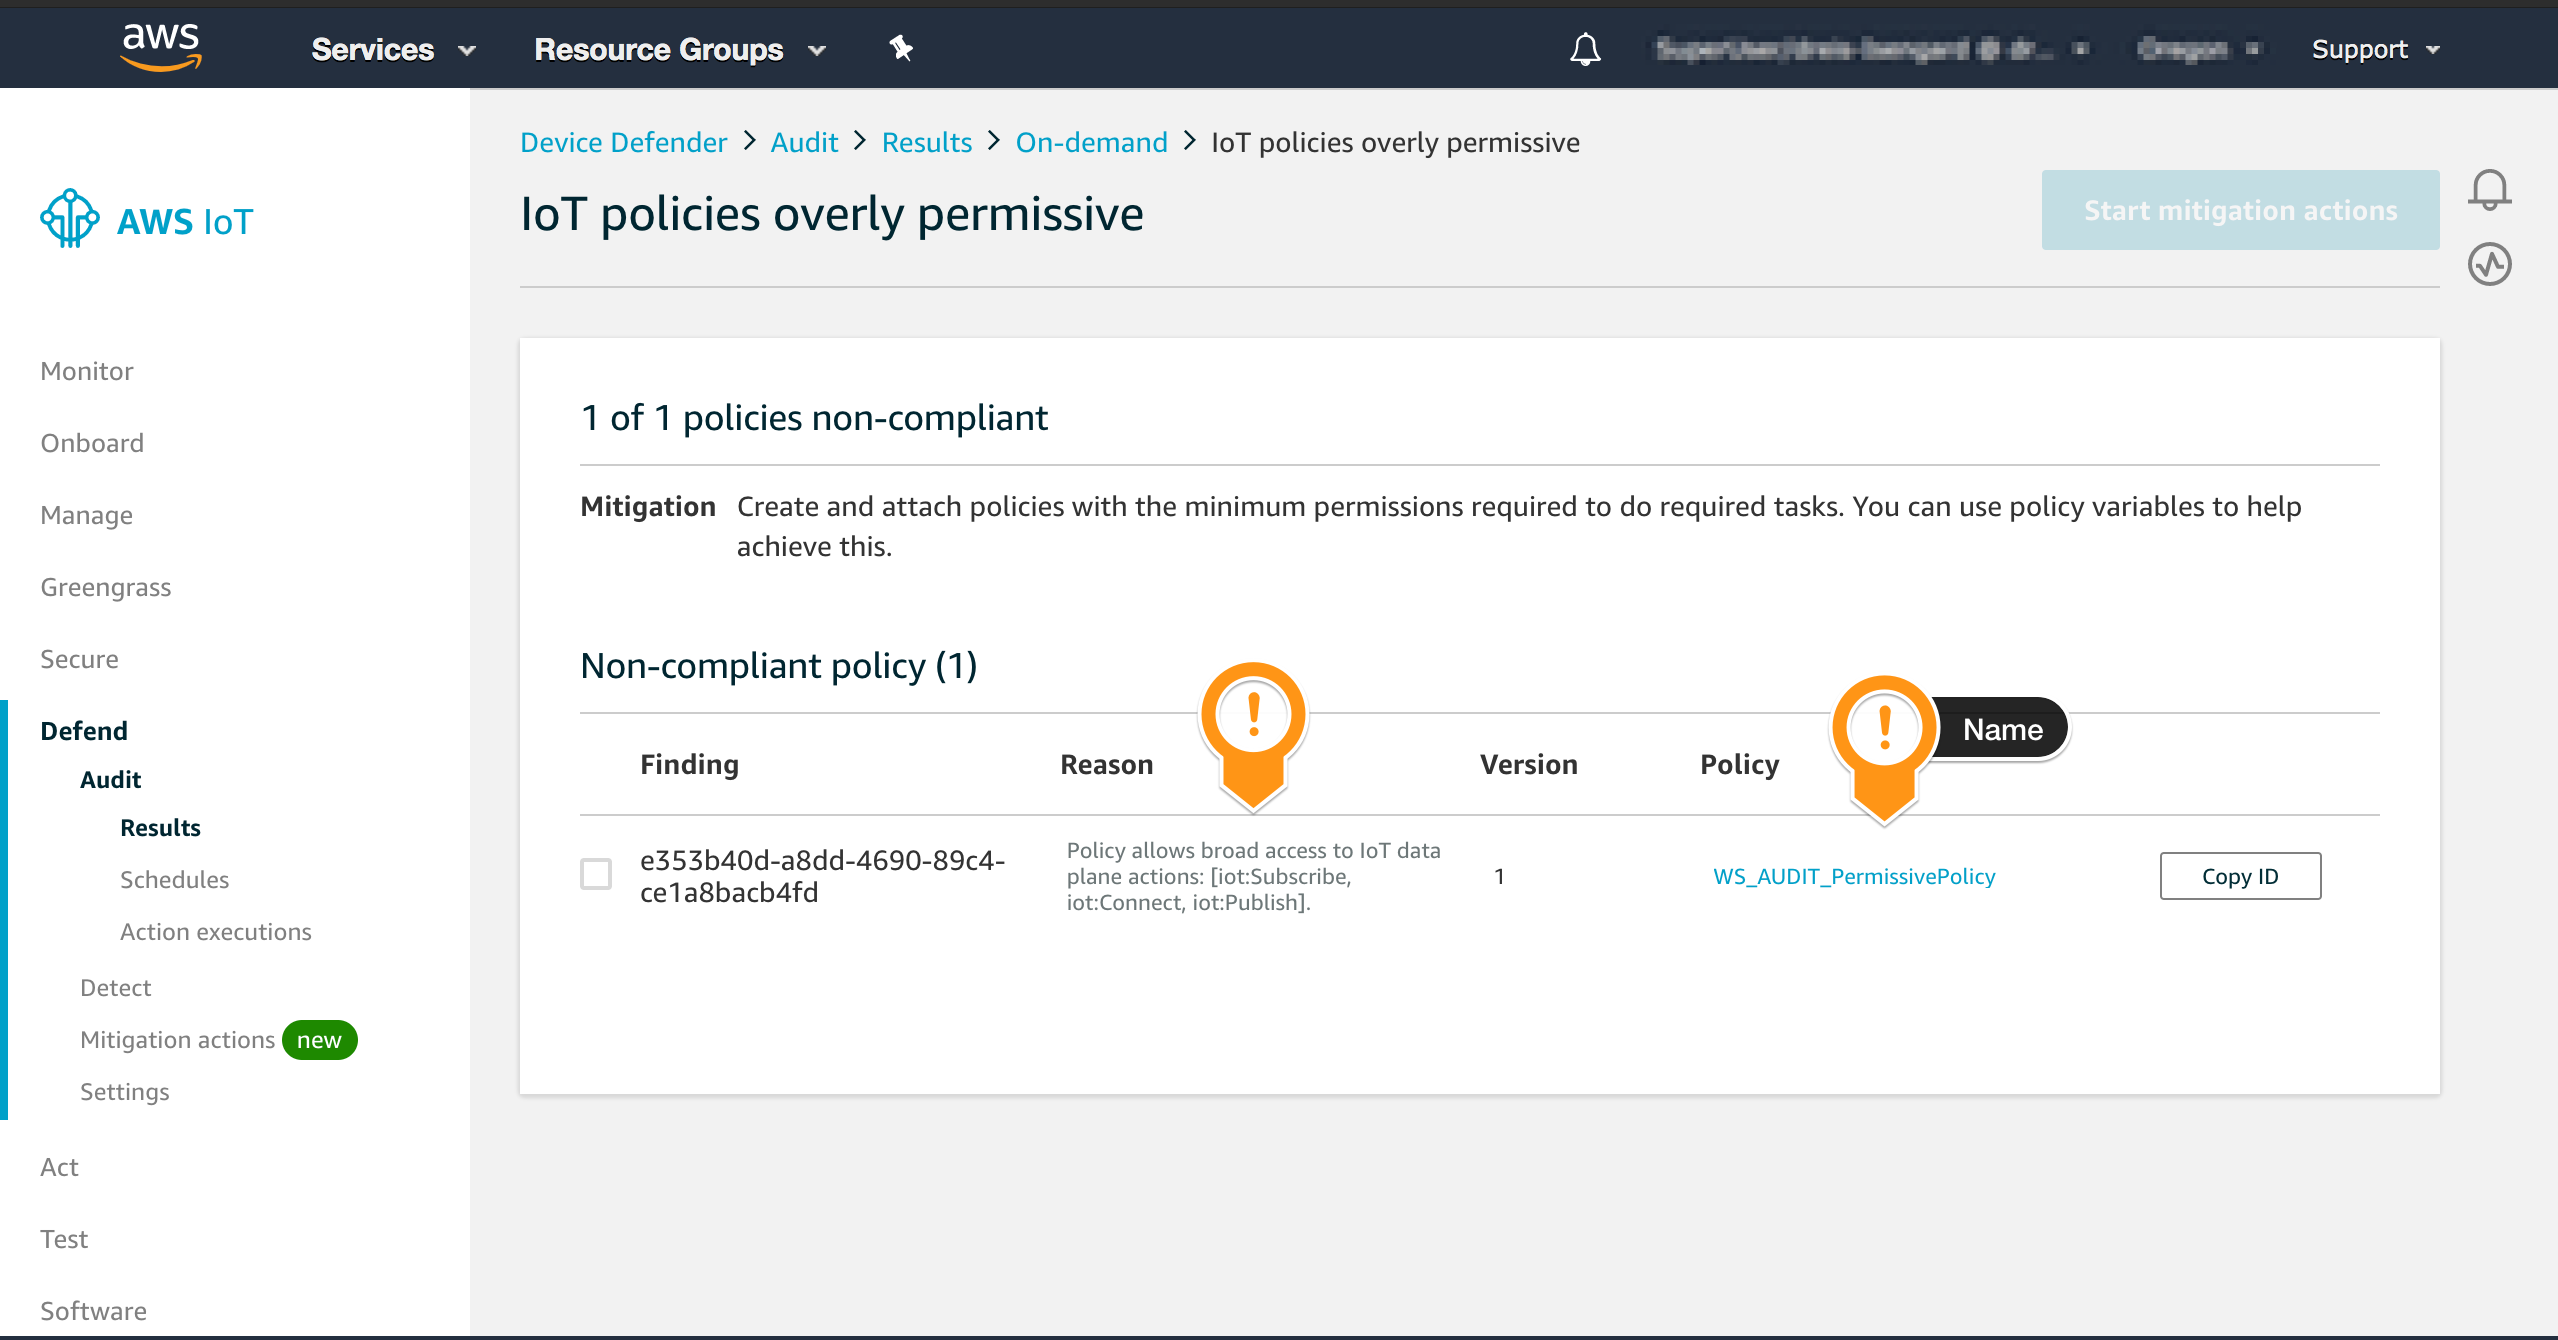
- Open the AWS IoT console
- In the left navigation pane, choose Defend and then Audit
- Choose Results
- Choose the audit you created
- Check the results
- Choose the check name IoT policies overly permissive to see a detailed report
To describe an audit task, enter this command:
$ aws iot describe-audit-task \
    --task-id <task-id>
Validating the Mitigation Action
After completing the audit, the AWS Lambda function is triggered and updates the target policy. You can check that the mitigation strategy was successful by looking at the policy in the console.
To complete this task, follow these steps:
- Open the AWS IoT Core console
- In the left navigation pane, choose Secure, and then choose Policies
- Search for the specific policy by using the text box. For example,
WS_AUDIT_PermissivePolicy - Click on the Search Icon
- Choose the policy displayed on the right panel
- Scroll down to locate the Policy Document section
- Check that the policy document was updated with the restrictive policy you configured
Sample output:
$ aws iot get-policy \
    --policy-name AUDIT_WS_PermissivePolicy \
    --query "policyDocument" \
    --output text | jq .
{
  "Version": "2012-10-17",
  "Statement": [
    {
      "Action": [
      ],
      "Resource": "*",
      "Effect": "Allow"
    }
  ]
}
Conclusion
You learned how to set up AWS IoT Device Defender Audit, understand the payloads generated by this service, work with a Lambda function to create an automated mitigation strategy!