Fleet Indexing

To include all things from your fleet into the newly created groups, you need to enable fleet indexing.
Enable Fleet Indexing
Let´s configure your indexing configuration and run your search queries.
Go back to the Cloud9 tab opened previously:
- Copy and paste the command is below into the Cloud9 terminal:
aws iot update-indexing-configuration \
    --thing-indexing-configuration thingIndexingMode=REGISTRY_AND_SHADOW \
    --thing-group-indexing-configuration thingGroupIndexingMode=ON &&\
echo "Fleet Indexing enabled successfully"|| echo "Error executing the command"
AWS IoT should complete the indexing in a few minutes. If you see errors in the next steps, maybe you have to wait a little more.
You have enabled Fleet Indexing. Now you will use it to query the devices and register accordingly in groups.
Learning about Fleet Indexing capabilities
Now that you enabled Fleet Indexing, you can use it to identify every device in the LasVegas Location:
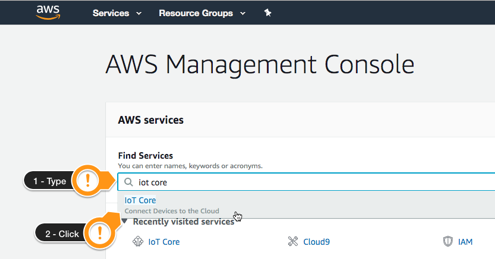
Open the AWS IoT Console, if it is not already opened:
- Type
iot coreon the Find Services - Click on IoT Core result
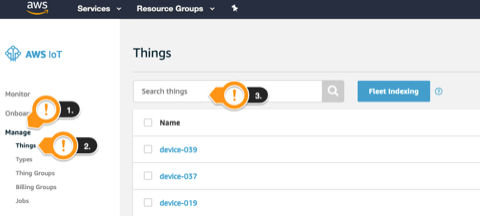
 Under the IoT Home page, on the left menu:
 - Under Manage click Things
- Click Search Things Field
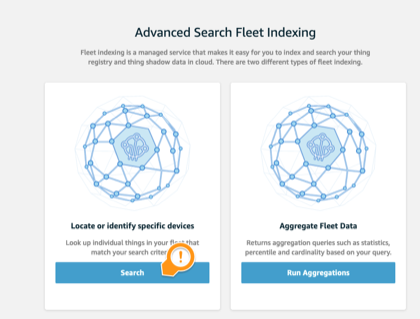
- Click Search under Locate or identify specific devices
If the Advanced Search Fleet Indexing screen doesn’t show up, try refresh the page
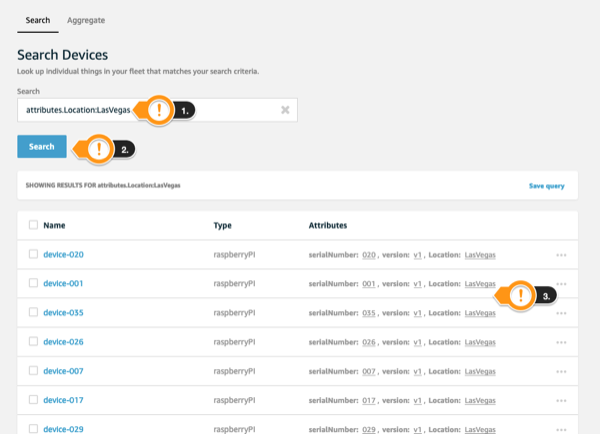
- On the Search field, type
attributes.Location:LasVegas- On the green panel, click skip quick tour
- Click search
- Notice the devices under Las Vegas location
(The returned devices might differ from your screen)
- On the Search field type
attributes.serialNumber:[10 TO 15] - Click Serch
- Notice the returned things. (Again, the returned devices might differ from your screen)
Adding Things to Groups
In this exercise, you will leverage queries to include devices into the correct groups, beginning with SaoPaulo devices.
The following command iterates on every device that has the Location attribute as SaoPaulo and add it to the corresponding group. As the output of the AWS IoT command is in JSON format, it will use the jq command to parse the results.
Go back to the Cloud9 tab opened previously:
- Copy and paste the command is below into the Cloud9 terminal:
# Using search index, add things to their respective groups
# to deal with the json output from the search-index command, we are going to use jq
JSON=`aws iot search-index \
    --query-string attributes.Location:SaoPaulo \
    --output json` &&
for row in $(echo "$JSON"| jq -r '.things[] |@base64'); \
do
    aws iot add-thing-to-thing-group \
    --thing-group-name SaoPaulo \
    --thing-name $(echo "$row"| base64 --decode |jq -r '.thingName'); \
done &&
echo "Things added successfully" || echo "Error executing the command"
Now run the following script to add every device left in the US to its matching group:
- Copy and paste the command is below into the Cloud9 terminal:
# Using search index, adding things on respective group
# to deal with the json output from the search-index command, we are going to use jq
JSON=`aws iot search-index \
    --query-string 'NOT attributes.Location:SaoPaulo' \
    --output json` &&
for row in $(echo "$JSON"| jq -r '.things[] |@base64'); \
do
    aws iot add-thing-to-thing-group \
    --thing-group-name $(echo "$row"| base64 --decode |jq -r '.attributes.Location') \
    --thing-name $(echo "$row"| base64 --decode |jq -r '.thingName'); \
done &&
echo "Things added successfully" || echo "Error executing the command"
This command can take a while to execute. Wait for the success message.
Conclusion
Congratulations! You have learned to index and search your registry. You can move to the next section.