Detect: Mitigation Device Side
Your devices connects to Internet through a metered connection and you want to keep costs down. A couple of weeks ago, another company faced a situation on some of their devices where they would get tampered and join a malicious botnet, participating in DDoS attacks.
You thought that monitoring a few metrics such as the amount of packets on the device and reporting them to the IoT solution could help detecting this kind of threat earlier. That is exactly what AWS Device Defender Detect does using device side metrics.
You need to run an agent on each device that report key metrics to AWS IoT Reserved Device regularly.
In a real-world scenario, you would need to develop the device-side code to send the device-side metrics to AWS IoT. For this Lab, the Virtual Devices are already equipped with the required code that measures and sends data every 5 minutes to reserved AWS IoT Topics such as:
$aws/things/$THING_NAME/defender/metrics/json
More information on AWS IoT Device Defender Detect - Device Side Metrics .
Notice the following best-practice and limitations:
- A device should, generally, send a metric report once every 5 minutes. Devices are throttled to one metric report every 5 minutes. (A device can’t make more than one metric report every 5 minutes.)
- Devices must report current metrics. Historical metrics reporting isn’t supported.
You will walk through a solution which has the following tasks:
- Configure AWS IoT Device Defender Detect
- Setup a SNS Topic to send Alerts to an AWS Lambda Function
- Understand and update the AWS Lambda function to process the audit results and fix detected issues
- Start a rogue device
- Validate the mitigation action
Cloud9 Preparation
For this chapter, we’ll make use of the ecs-cli to get the Virtual Device public IP. The Amazon Elastic Container Service (Amazon ECS) command line interface (CLI) provides high-level commands to simplify creating, updating, and monitoring clusters and tasks from a local development environment, see: https://docs.aws.amazon.com/AmazonECS/latest/developerguide/ECS_CLI.html.
To install the ecs-cli, follow along the install guide ( https://docs.aws.amazon.com/AmazonECS/latest/developerguide/ECS_CLI_installation.html ) or copy and paste the following command in the Cloud9 terminal
sudo curl -Lo /usr/local/bin/ecs-cli https://amazon-ecs-cli.s3.amazonaws.com/ecs-cli-linux-amd64-latest
gpg --keyserver hkp://keys.gnupg.net --recv BCE9D9A42D51784F
curl -Lo ecs-cli.asc https://amazon-ecs-cli.s3.amazonaws.com/ecs-cli-linux-amd64-latest.asc
gpg --verify ecs-cli.asc /usr/local/bin/ecs-cli
sudo chmod +x /usr/local/bin/ecs-cli
Test that everything is installed correctly by typing:
ecs-cli --version
The ecs-cli version should be visualized.
Setting up AWS IoT Device Defender Detect
To create a Security Profile, follow the steps below, which are similiar to what you’ve done in the previous section:
- Open the AWS IoT console
- In the left navigation pane, choose Defend
- In the left navigation pane, choose Detect
- In the left navigation pane, choose Security profiles
- Click Create Security Profile
- Click Create Rule-based anomaly Detect profile

In this section, you will specify the behavior that you want to monitor. For this lab, we’ll want to keep track of the amount of Outbound Bytes our devices network cards send.
In a real-world scenario, to avoid generating lots of false-positive, more metrics than just the Outgoing Bytes should be analyzed, for example:
- Remote Address: An IP address communicating with the device. In addition to legitimate IP addresses, this metric will also contain the attacker’s IP address.
- Number of TCP connections: The number of connections between a server and the IoT device. In addition to legitimate communication between the server and the device, this metric will also contain the connection between the attacker and the device.
- Incoming bytes: The number of bytes received by the device. In addition to legitimate communication with the device, this metric will also include the number of bytes that correspond to malware and commands sent by the attacker.
For more information, you can check out this awesome blog post by Eknath: Use AWS IoT Device Defender to detect statistical anomalies and to visualize your device security metrics
- For Name, type a value to identify this profile. For example,
OutboundBytesSecProfile - Scroll to the Behaviors section
- Fill the Name field for the first Behavior. Example:
OutboundBytesBehavior - On the Metric field, choose Bytes out
- On the Operator field, choose Greater than
- On the Value field, type 35.000
- On the Duration field, choose 5 minutes
- Scroll down to finish the setup
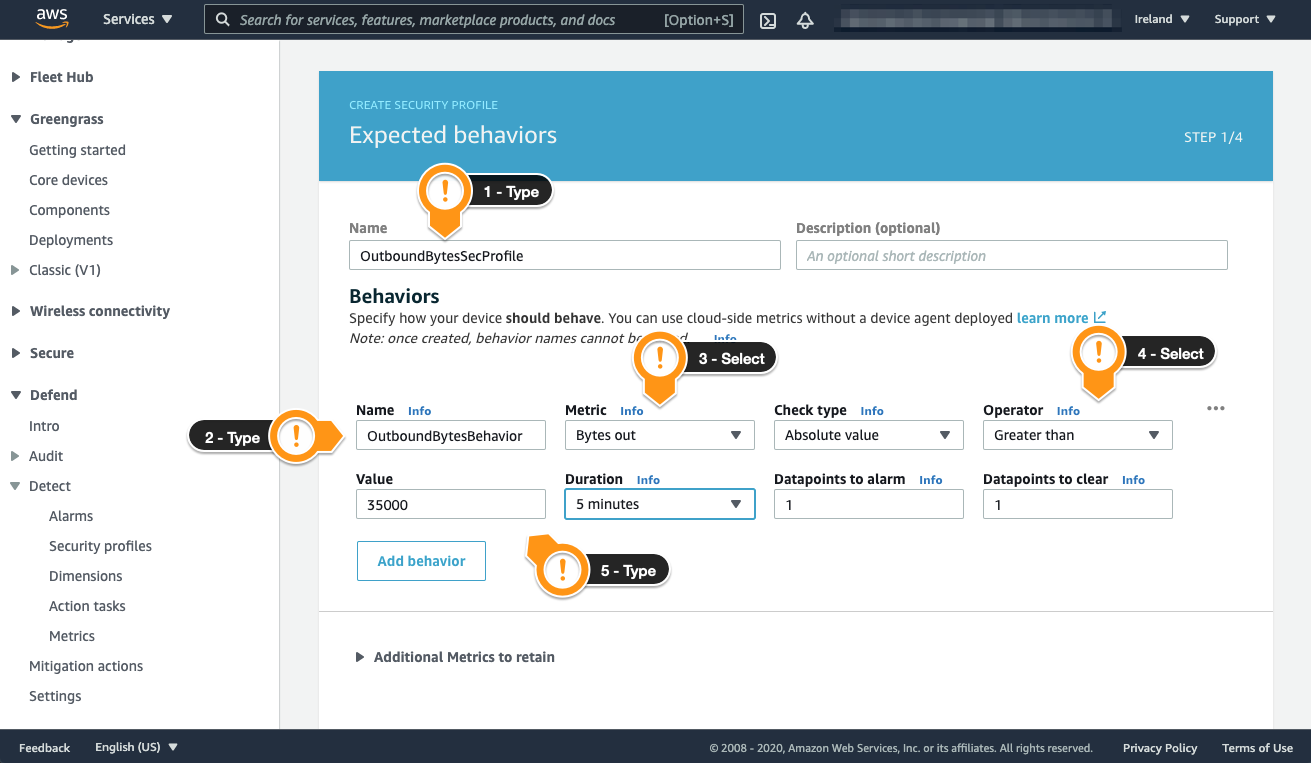
- Leave the Additional Metrics to retain blank
- Click Next on the bottom right
When you create a Security Profile, Behaviours are not mandatory, that’s because it is good practice to monitor your devices behaviour before setting one up.
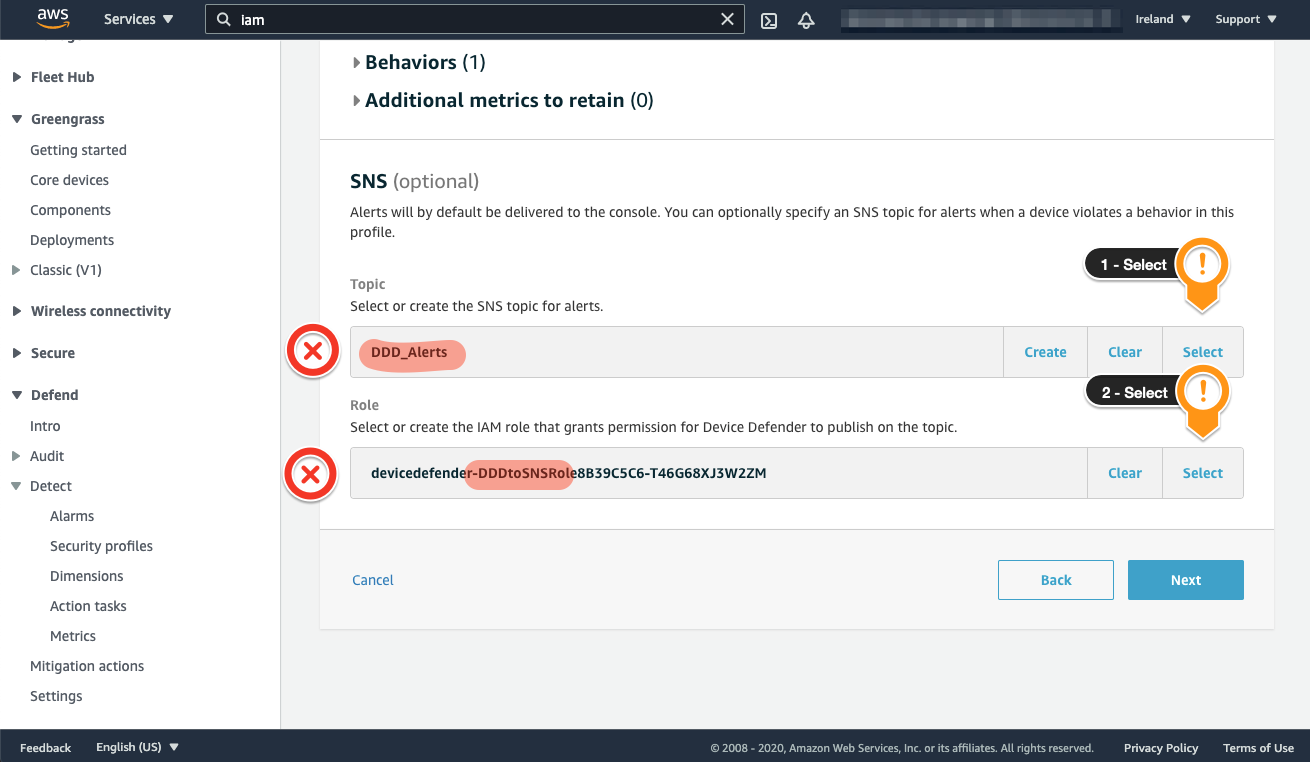
Now, you will need to configure an SNS topic to receive the Alerts and a Role allowing AWS IoT Device Defender Detect to post message to it.
- Locate the Topic session
- Choose Select
- Choose the Topic DDD_Alerts that was previously created during the setup
- Locate the Role session
- Choose Select
- Choose the Role containing DDDtoSNSRole that was previously created during the setup
- Click Next on the bottom right
On the next screen, you need to select which devices AWS IoT Device Defender Detect should monitor. For this workshop, you will attach the Security Profile to all devices, but in a production environment, you can select the appropriate target depending on the Profile.
- Choose All things
- Click Next on the bottom right
- Scroll down and choose Save
- Choose Continue to finish the setup
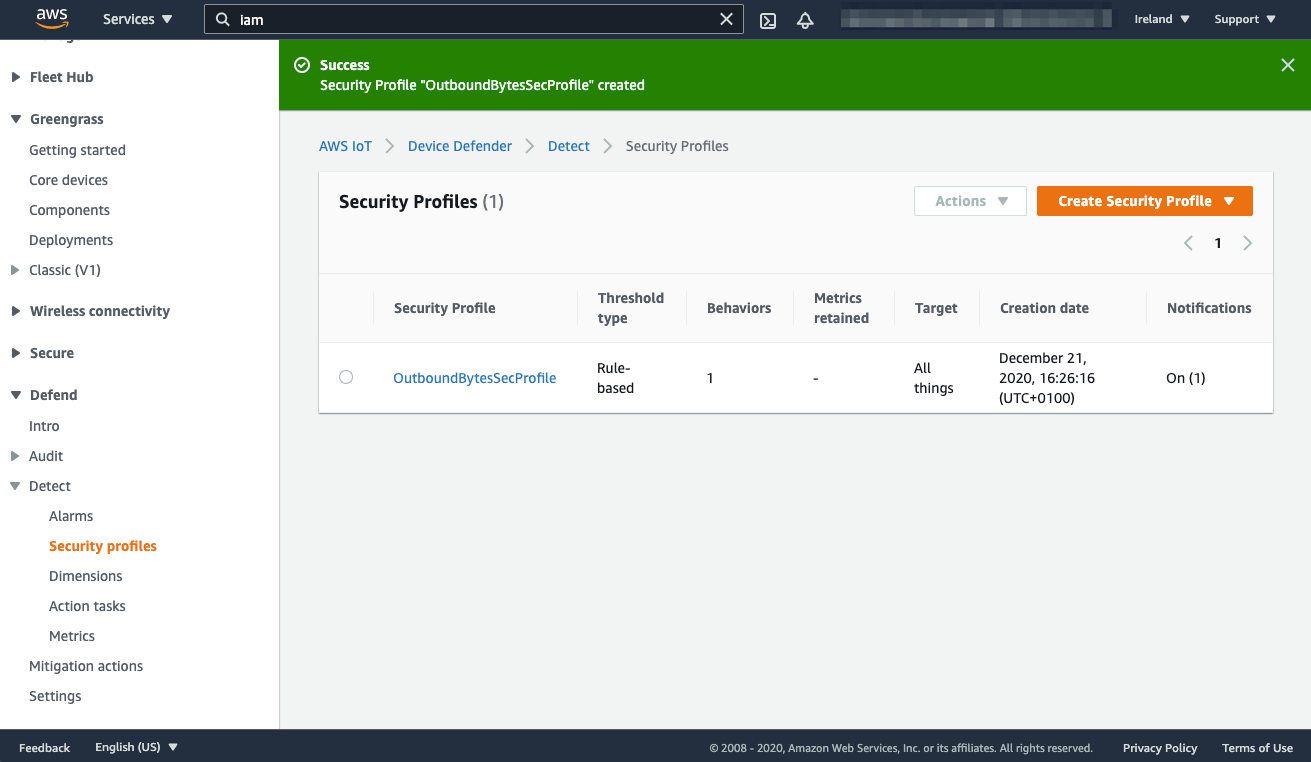
Now, AWS IoT Device Defender is continuosly monitoring the amount of messages sent by each device. Let’s check what happens when a thing starts to present an anomalous behavior.
Forcing an Anomalous Behavior
Go back to the Cloud9 console.
Run the script that forces the device to send large packets:
cd ~/environment/aws-iot-playground
./scripts/send_large_payload.sh
You can also see the near-realtime graph in the Device section, remember that Device-side data have a 5-minute granularity.
- Open the AWS IoT console
- In the left navigation pane, choose Manage
- In the left navigation pane, choose Things
- Open the created Thing (e.g. dev-XXXX)
- Select Defender Metrics
- Select Bytes Out from the Metric drop-down
Checking
The Alert will trigger the lambda function that will move the virtual device to the Quarantine Thing Group. You can check if it worked following the steps.
- Open the AWS IoT console
- In the left navigation pane, choose Defend
- In the left navigation pane, choose Detect
- In the left navigation pane, choose Alarms
Executing a Mitigation Action
Mitigation actions really depends on the kind of device, environment and processes your company may have in place, they could range from:
- Move the device to a permission-restricted policy group, like we did in this lab to inhibit the device from sending messaging to AWS IoT
- Using AWS IoT Secure tunneling to better identify and assess the device’s status
- Instructing customers and/or technicians to perform a physical device reset
- Perform a device-recall program
Conclusion
Good job, IoT Fleet Manager! You learned how to setup AWS IoT Device Defender Detect for device-side metrics and discovered the possible mitigation actions that can be performed on the devices.