Detect: Mitigation Cloud Side
Your first security mitigation solution helped the company to solve the most pressing issues in a short time span. Now, you want to evaluate if any device starts to behave anomalously. This may indicate different problems that require immediate attention, for example, a new bug or a compromised credendital. In this part, you will learn how to use AWS IoT Device Defender to simplify this task. The sample architecture shows an example of how to setup AWS IoT Device Defender Detect to monitor your devices’ behavior and quarantine them if required.
You will walk through a solution which has the following tasks:
- Configure AWS IoT Device Defender Detect
- Setup a SNS Topic to send Alerts to an AWS Lambda Function
- Understand and update the AWS Lambda function to process the audit results and fix detected issues
- Start a rogue device
- Validate the mitigation action
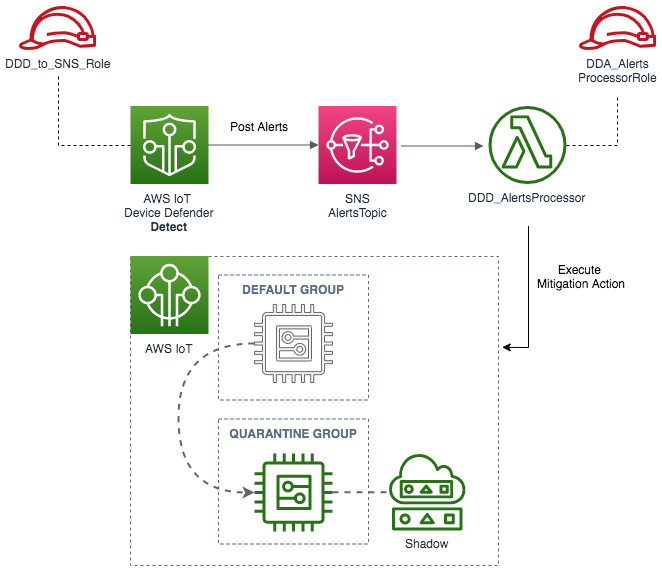
The diagram below depicts the AWS services used in this solution and the main steps executed after completing the setup.
You should only use the architecture and sample code displayed below as a guideline.
Understanding AWS IoT Device Defender Detect
A Behavior tells AWS IoT Device Defender Detect how to recognize when a device is doing something abnormal. Each behavior consists of a name, a metric, an operator, a value, and, in some cases, a time period (duration). Any device action that DOES NOT match a defined behavior statement triggers an alert.
A Security Profile defines anomalous behaviors for a group of devices (a thing group) or for all devices in your account, and specifies what actions to take when an anomaly is detected. AWS IoT Device Defender Detect starts recording security-related data and uses the behaviors defined in the security profile to detect anomalies in the behavior of the devices.
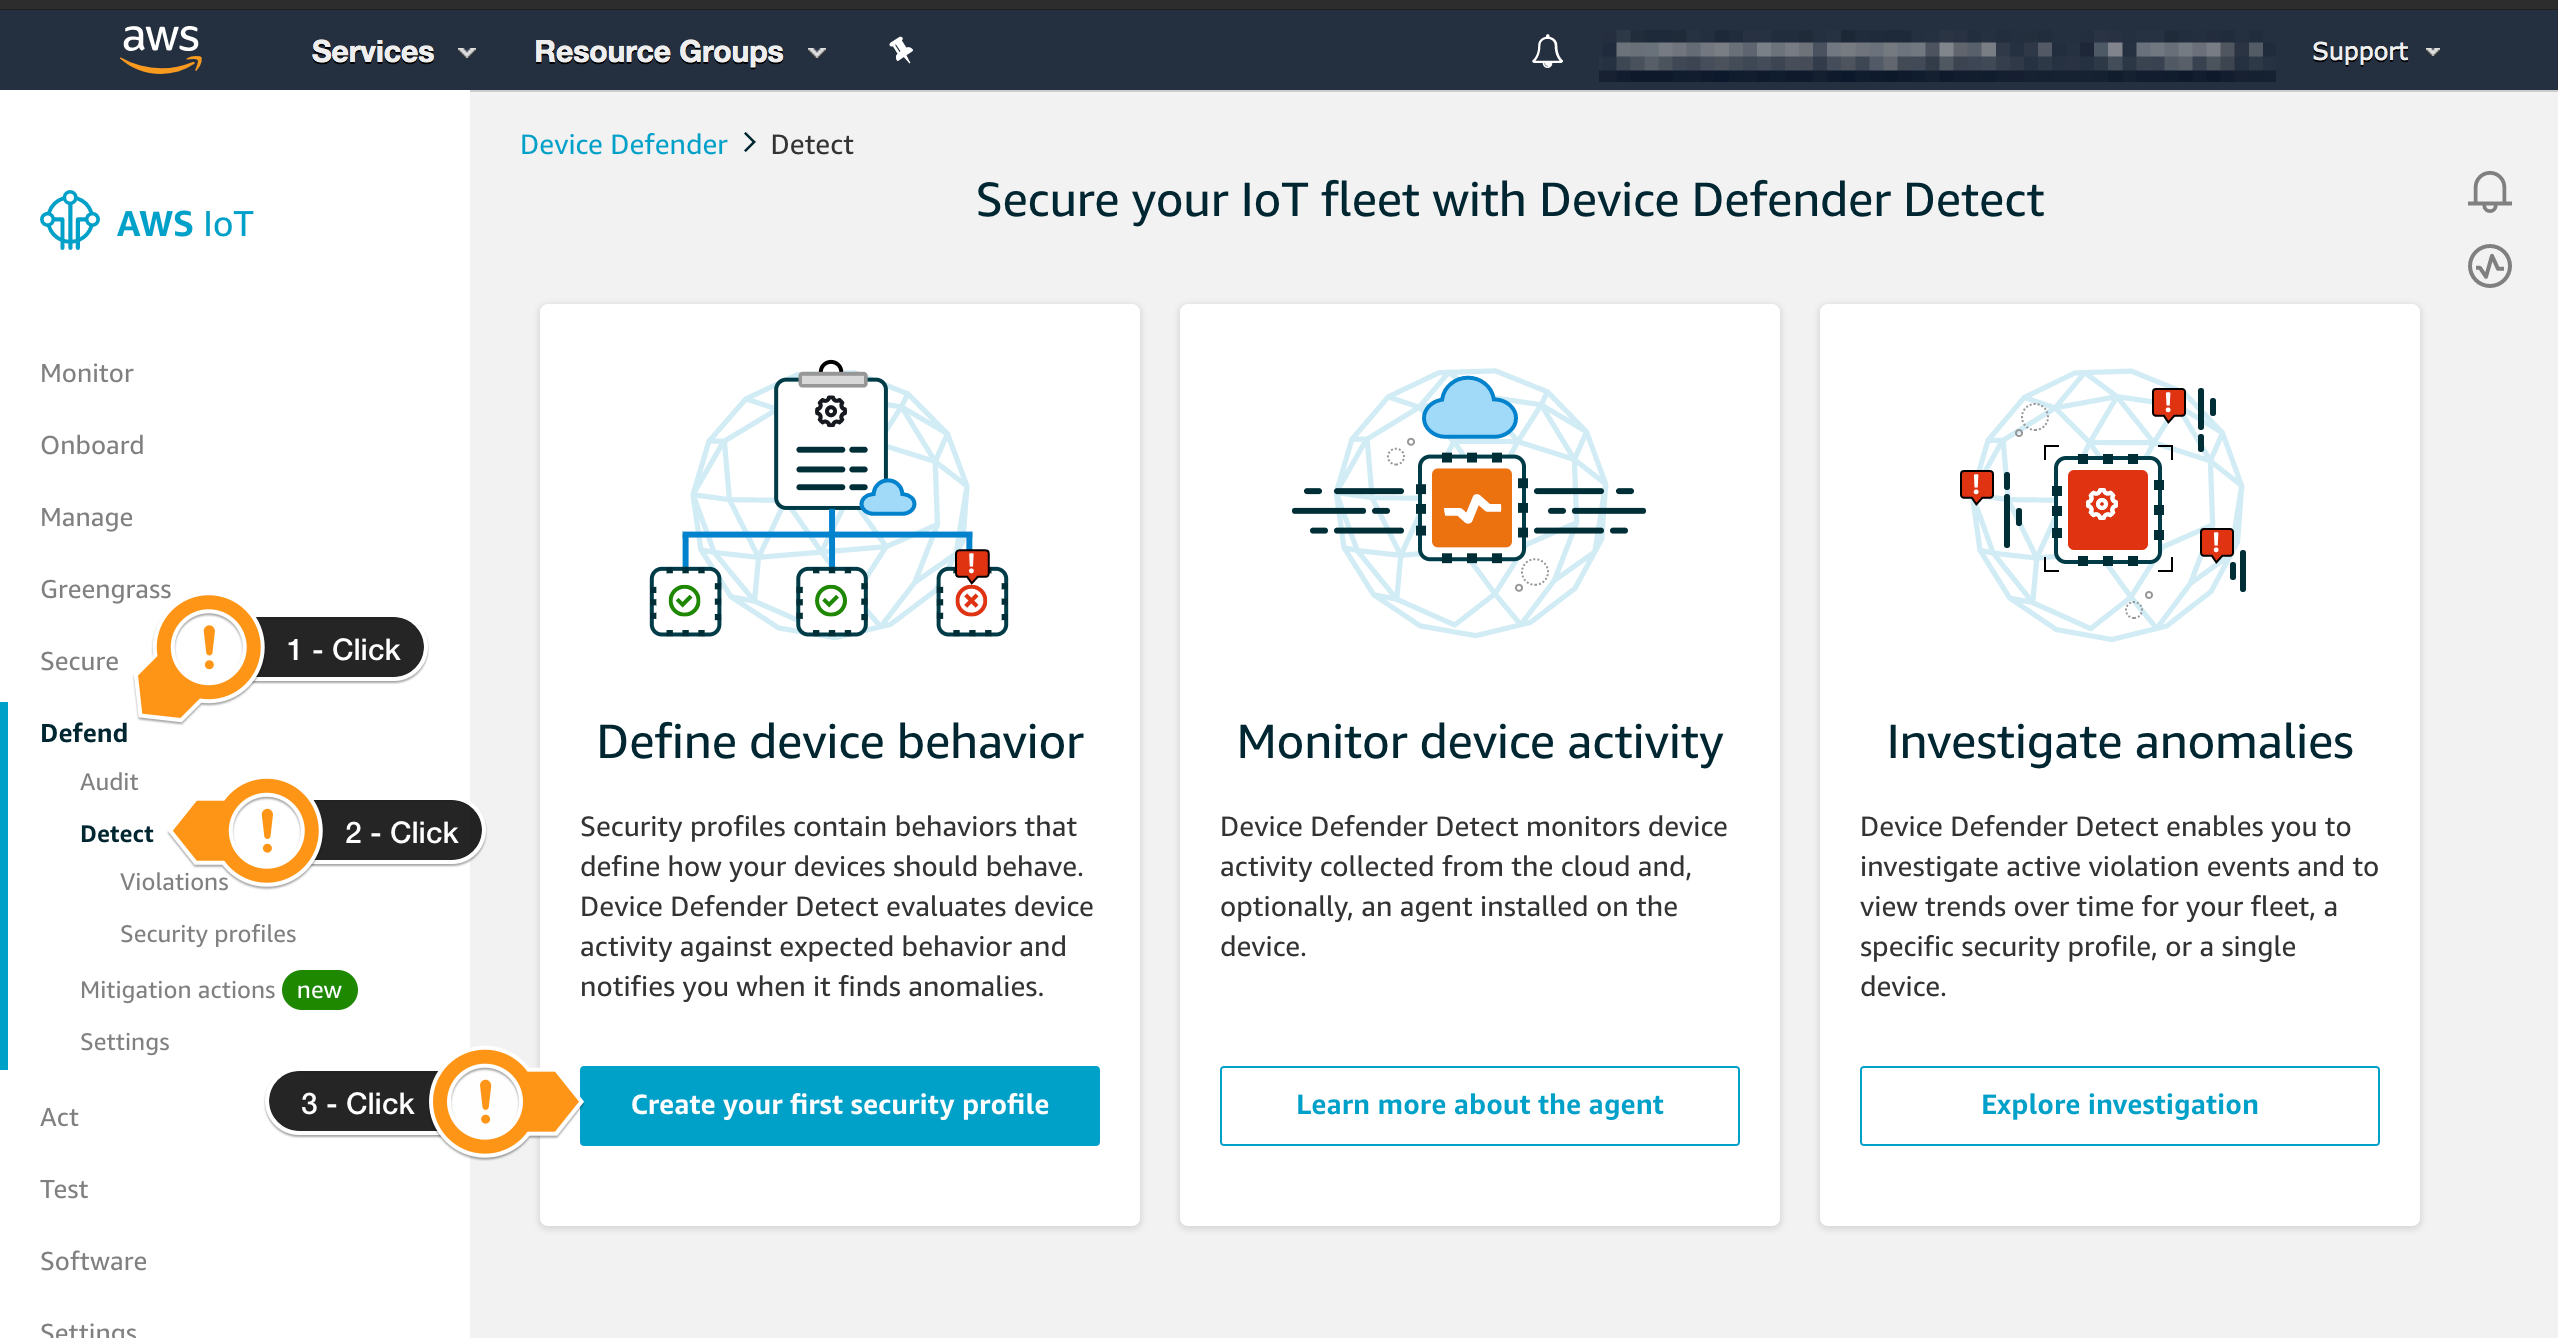
To create a Security Profile, follow the steps below:
- Open the AWS IoT console
- In the left navigation pane, choose Defend
- In the left navigation pane, choose Detect
- Choose Create your first security profile
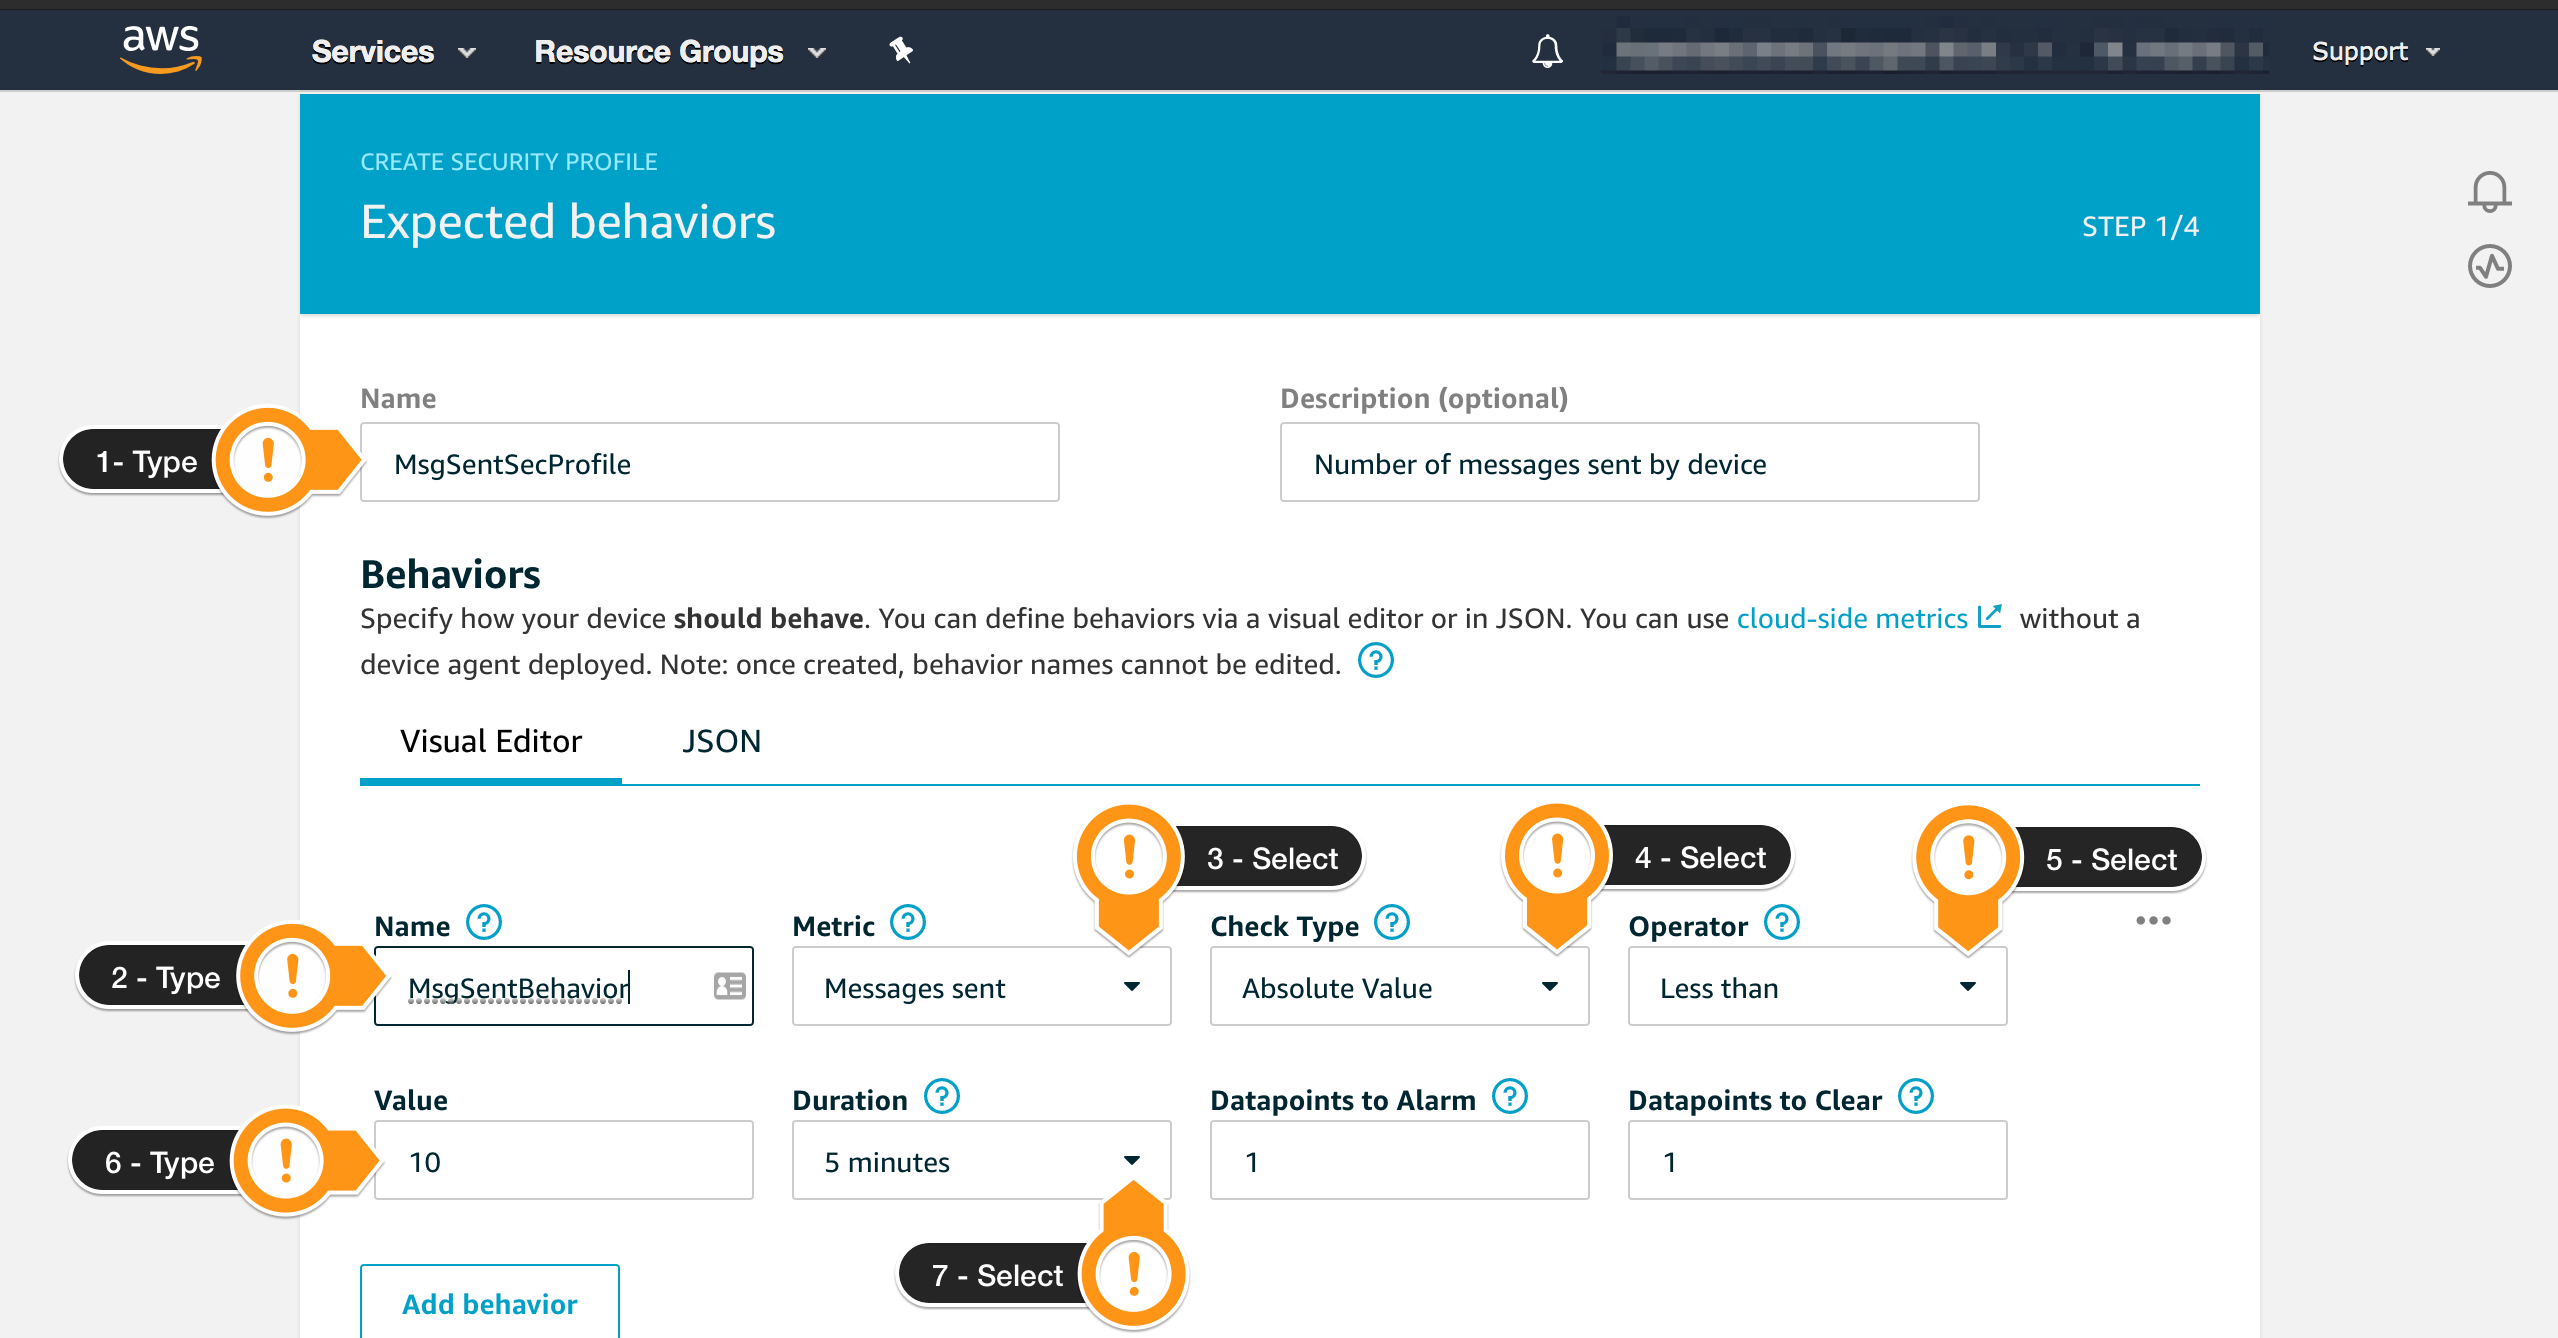
In this section, you will specify one behavior that you want to monitor. It will check if there are any failures on the authentication of the fleet. In a normal situation, you may have a few failures due to connectivity, but more than that may indicate a security issue, so you will create an alarm.
- For Name, type a value to identify this profile. For example,
MsgSentSecProfile - Scroll to the Behaviors section
- Fill the Name field for the first Behavior. Example:
MsgSentBehavior - On the Metric field, choose Messages sent
- On the Operator field, choose Less than
- On the Value field, type 5
- On the Duration field, choose 5 minutes
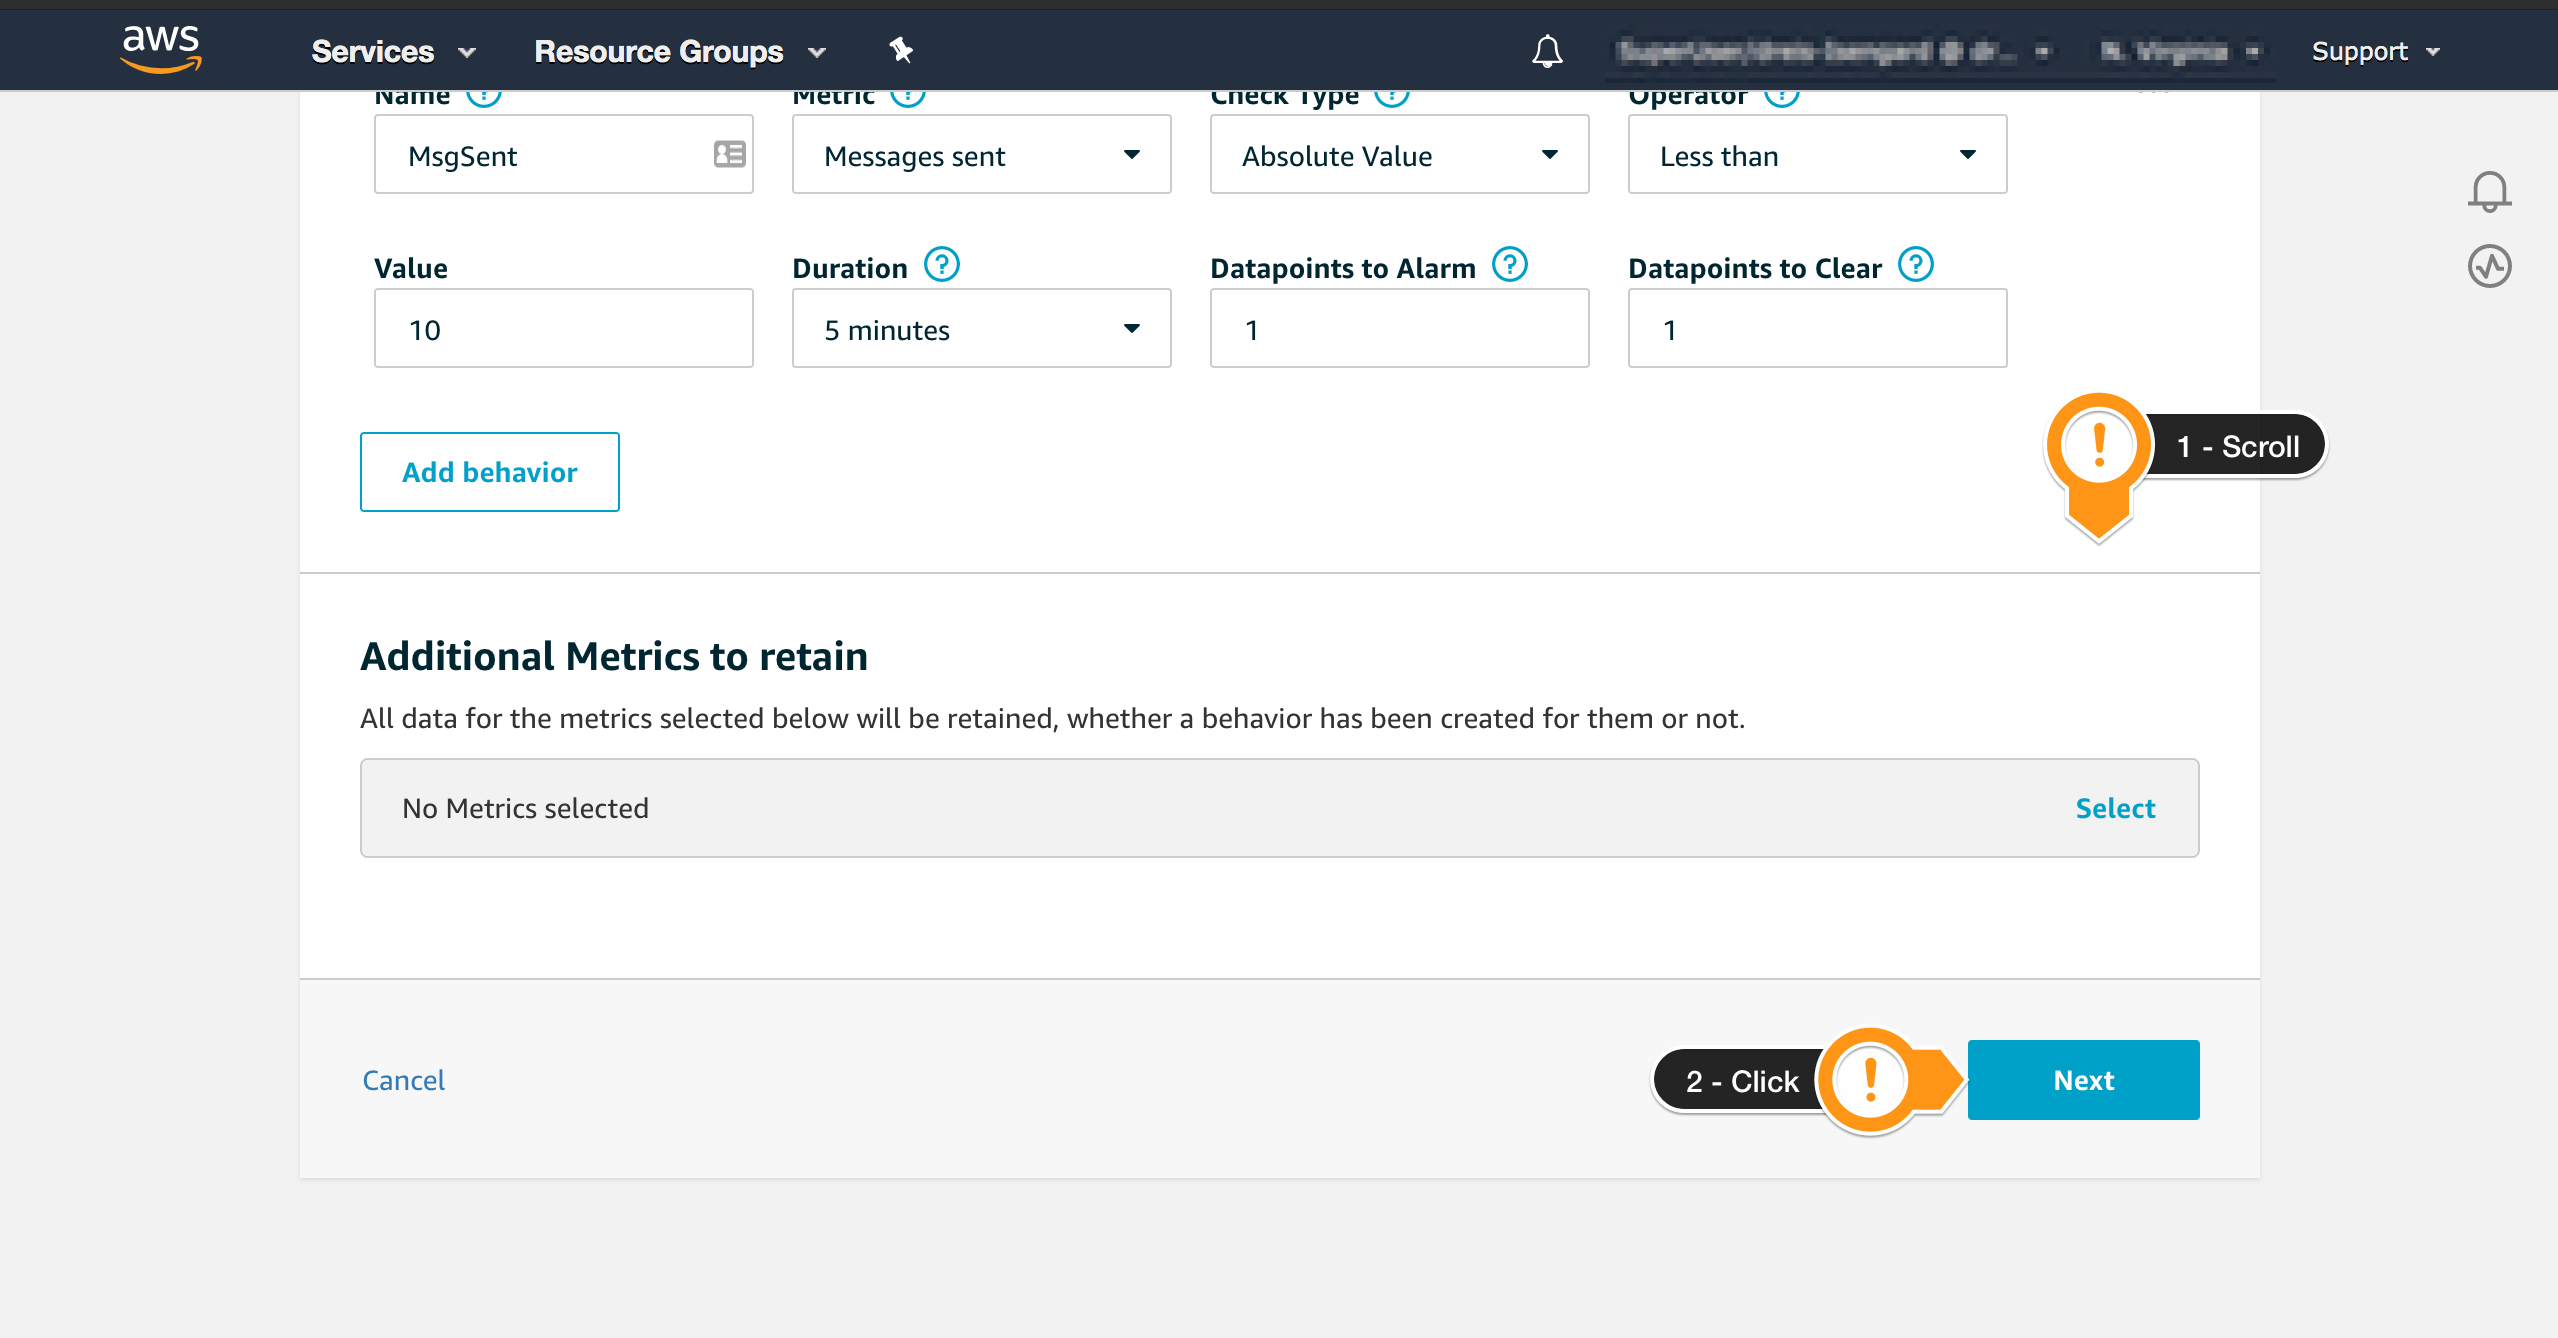
- Scroll down to finish the setup
- Click Next on the bottom right
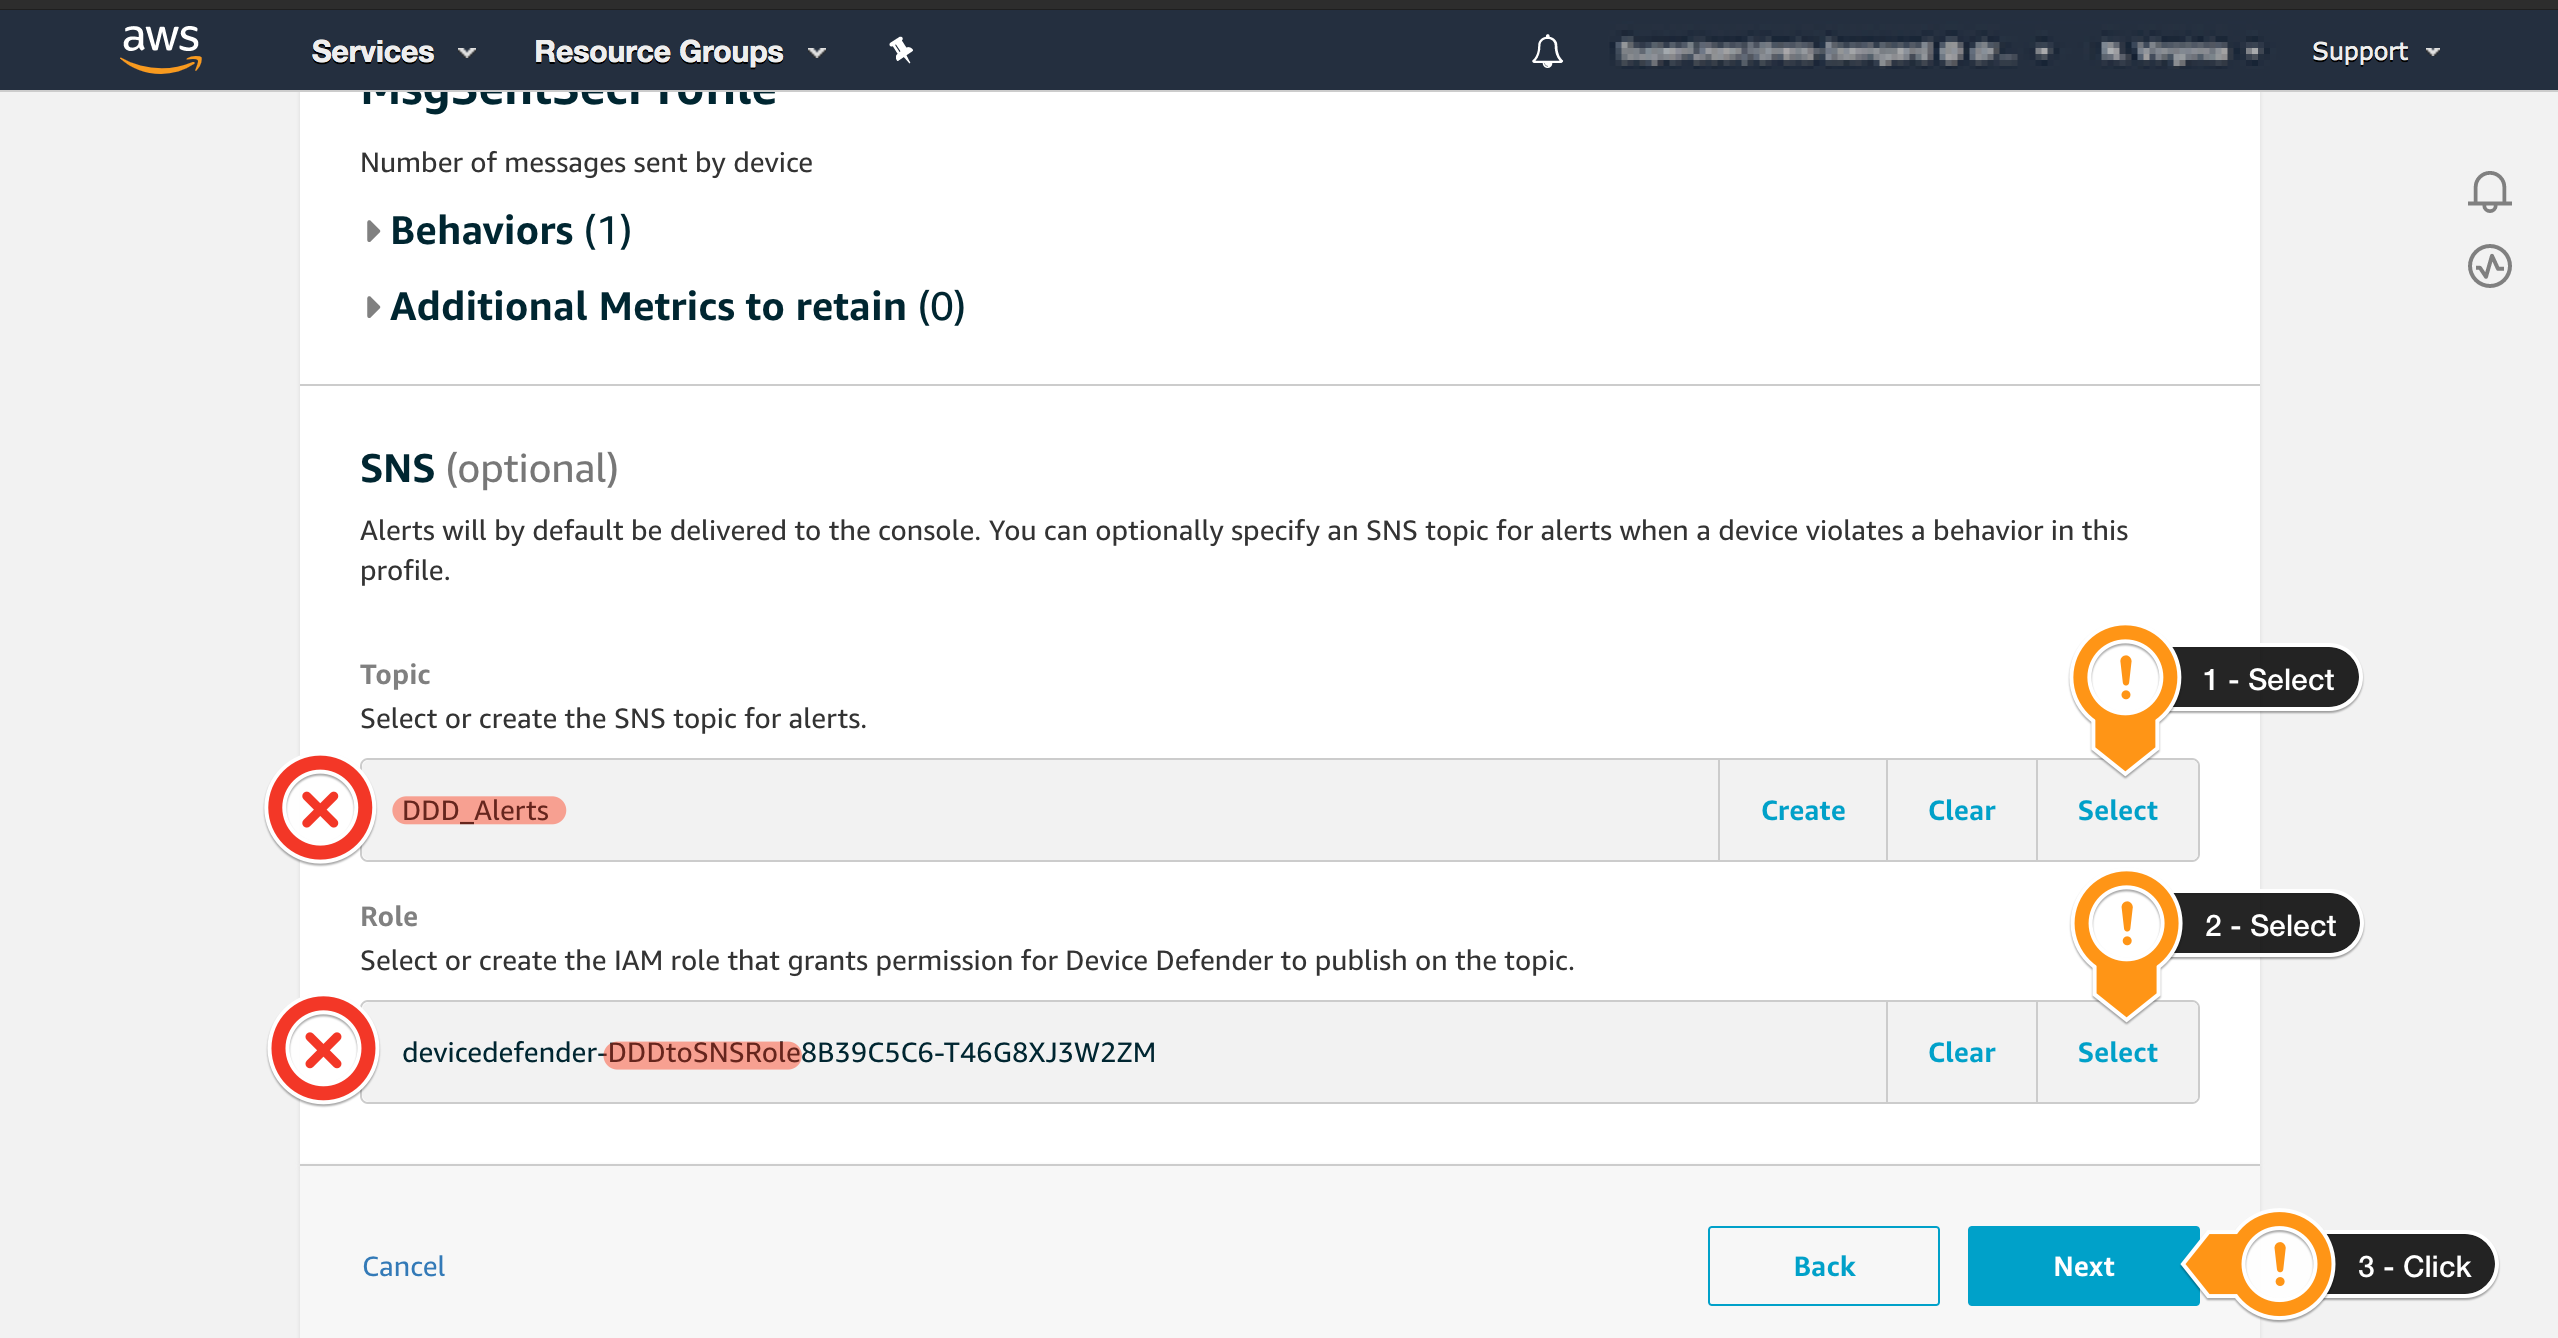
Now, you will need to configure an SNS topic to receive the Alerts and a Role allowing AWS IoT Device Defender Detect to post message to it.
- Locate the Topic session
- Choose Select
- Choose the Topic DDD_Alerts that was previously created during the setup
- Locate the Role session
- Choose Select
- Choose the Role containing DDDtoSNSRole that was previously created during the setup
- Click Next on the bottom right
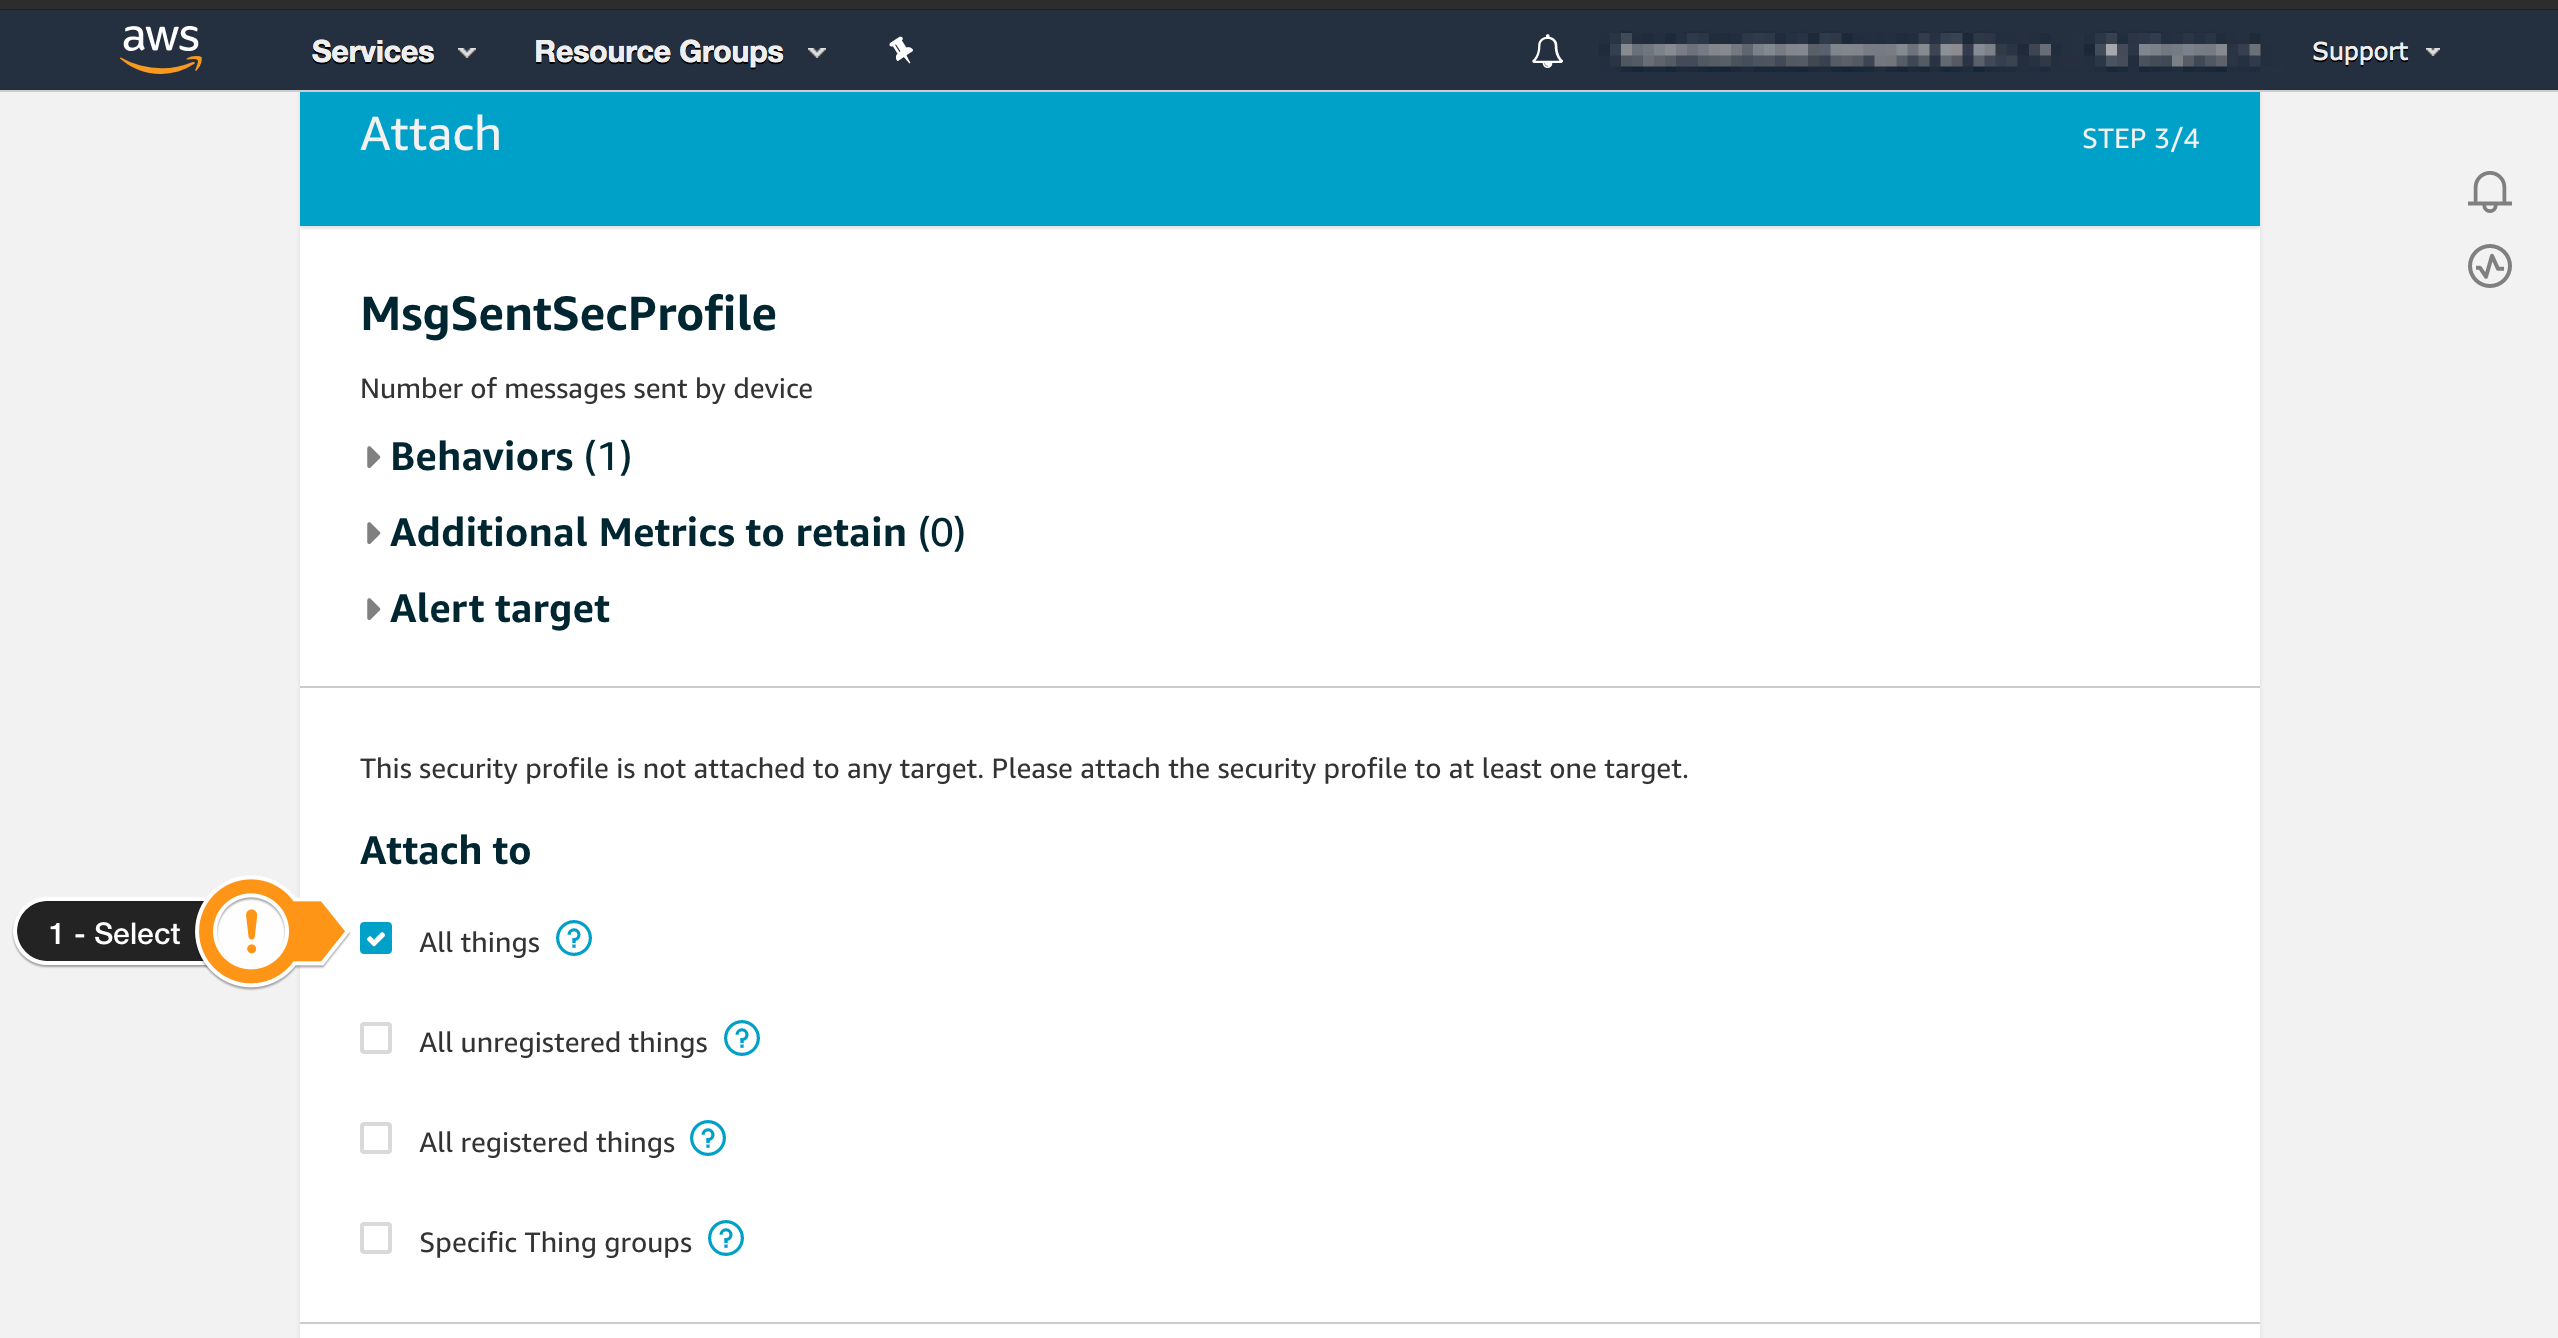
On the next screen, you need to select which devices AWS IoT Device Defender Detect should monitor. For this workshop, you will attach the Security Profile to all devices, but in a production environment, you can select the appropriate target depending on the Profile.
- Choose All things
- Click Next on the bottom right
- Scroll down and choose Save
- Choose Continue to finish the setup
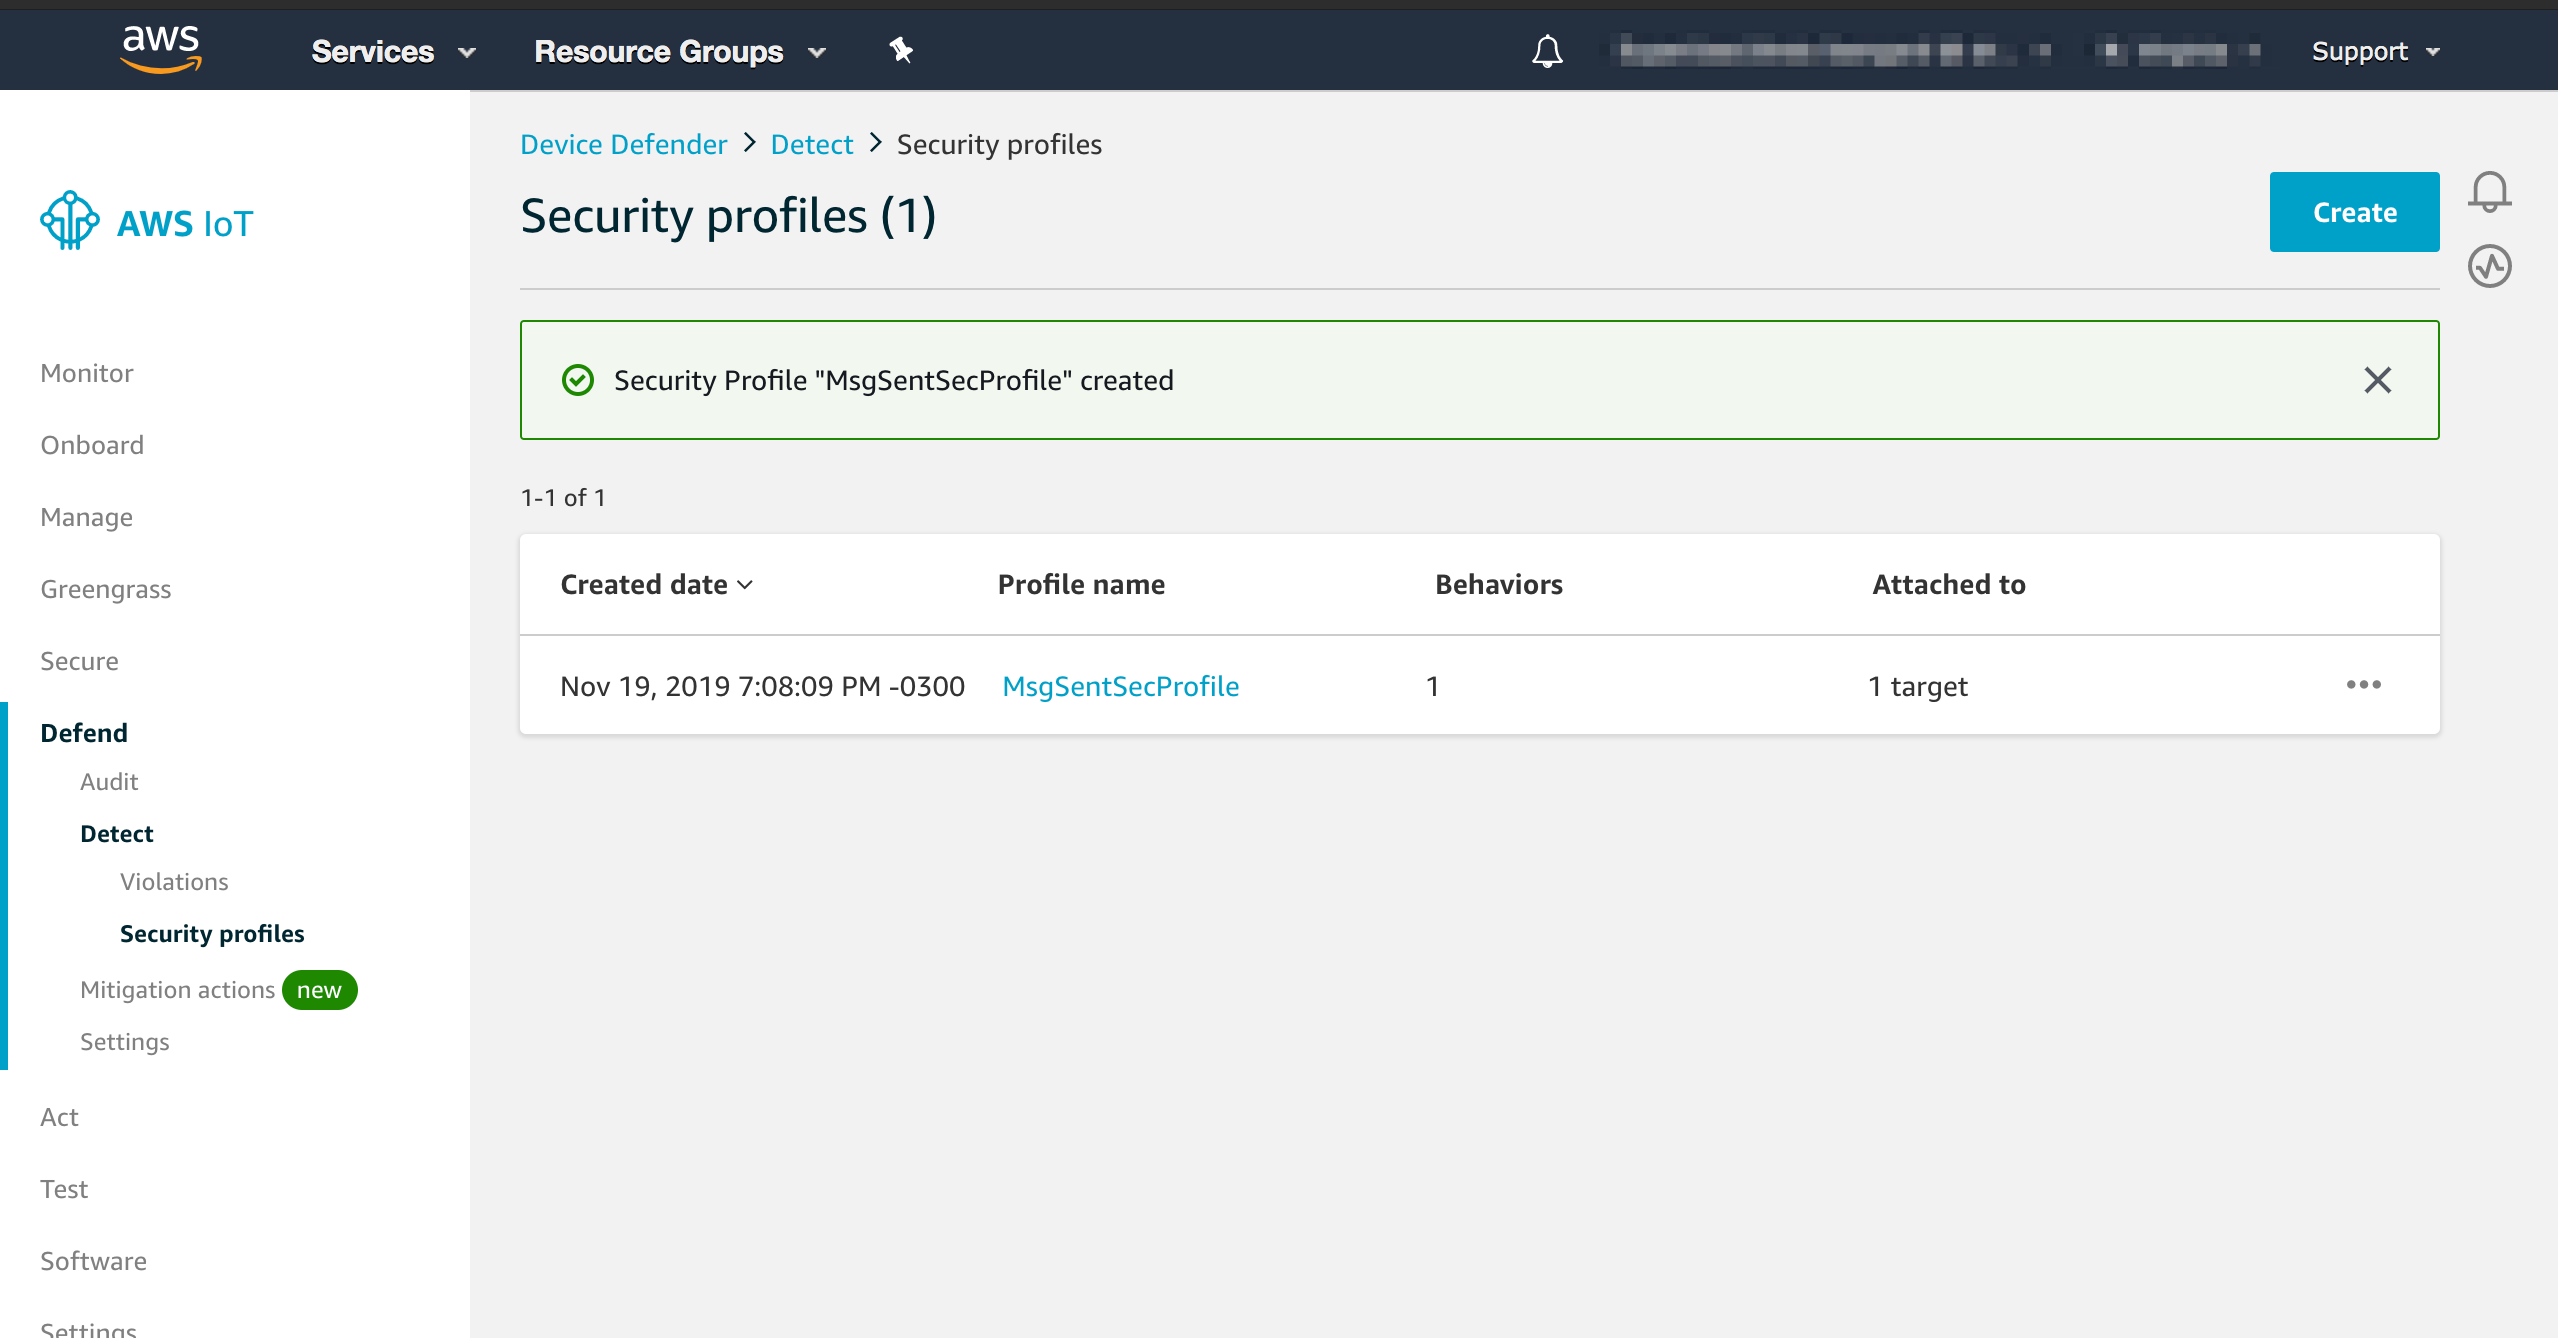
Now, AWS IoT Device Defender is continuosly monitoring the amount of messages sent by each device. Let’s check what happens when a thing starts to present an anomalous behavior.
Understanding the Event
Once configured, AWS IoT Device Defender will monitor your devices and send Alerts to the SNS topic you have configured. SNS will forward the message the Lambda mitigation function adding an envelope with Metadata such as EventVersion, SignatureVersion, Timestamp as showed on the example below.
{
    "Records": [
        {
            "EventSource": "aws:sns",
            "EventVersion": "1.0",
            "EventSubscriptionArn": "arn:aws:sns:us-east-1:xxxxxxxxxxxx:DDD_Violations:e17eb501-d98c-4f3c-bb84-c3acd06044e2",
            "Sns": {
                "Type": "Notification",
                "MessageId": "4a368c7b-c98a-5f32-82ba-da33de9e4d57",
                "TopicArn": "arn:aws:sns:us-east-1:xxxxxxxxxxxx:DDD_Violations",
                "Subject": null,
                "Message": "{\"violationEventTime\":1573786800000,\"thingName\":\"dev-IZWB\",\"behavior\":{\"criteria\":{\"consecutiveDatapointsToClear\":1,\"value\":{\"count\":10},\"durationSeconds\":300,\"consecutiveDatapointsToAlarm\":1,\"comparisonOperator\":\"less-than\"},\"name\":\"MessagesPub\",\"metric\":\"aws:num-messages-sent\"},\"violationEventType\":\"in-alarm\",\"metricValue\":{\"count\":54},\"violationId\":\"37e18651d207bbc74236c13faf146127\",\"securityProfileName\":\"MySecProfile\"}",
                "Timestamp": "2019-11-15T03:00:36.527Z",
                "SignatureVersion": "1",
                "Signature": "C+wmlktdLSErFjclDOc4J3LPBLfDUuvIv85NCytpr8pX4Bq/dMnUp6PXCkFIgknG/StekbAJHU0tlKM+aiAXfCKars65i1n+MmZ8Ekkmub70DvO1mCMItnf1TuTxzdljz8g+7fXNaW0qDZypSg3X5ofLPkrxL3r/SMMpAD2FCDD9DVqYk7mAmH6Sz6ygWbNRfKy297jokIjlar//Vu0uL4SmZ3Q2ygQPuq0qEIY7g/DtNdYS1lLhsIVbP0U4lawTck/pg1FmhoVZCG09+UGs9Y1wPM6d9jqLIfiuPXAy2gGncnCaEF66rnIqcX+mkrQSp+tL58cOrCuyybyyxdFmlQ==",
                "SigningCertUrl": "https://sns.us-east-1.amazonaws.com/SimpleNotificationService-6aad65c2f9911b05cd53efda11f913f9.pem",
                "UnsubscribeUrl": "https://sns.us-east-1.amazonaws.com/?Action=Unsubscribe&SubscriptionArn=arn:aws:sns:us-east-1:xxxxxxxxxxxx:DDD_Violations:e17eb501-d98c-4f3c-bb84-c3acd06044e2",
                "MessageAttributes": {}
            }
        }
    ]
}
The relevant information is at ['Records'][0]['Sns']['Message'] and you can get it with the following sample code.
This is an example of a aws:num-messages-sent message. It contains relevant information you can use to apply a mitigation response, for example, thingName, behavior name and metric.
{
  "violationEventTime": 1573786800000,
  "thingName": "dev-IZWB",
  "behavior": {
    "criteria": {
      "consecutiveDatapointsToClear": 1,
      "value": {
        "count": 10
      },
      "durationSeconds": 300,
      "consecutiveDatapointsToAlarm": 1,
      "comparisonOperator": "less-than"
    },
    "name": "MessagesPub",
    "metric": "aws:num-messages-sent"
  },
  "violationEventType": "in-alarm",
  "metricValue": {
    "count": 54
  },
  "violationId": "37e18651d207bbc74236c13faf146127",
  "securityProfileName": "MySecProfile"
}
Understanding the Mitigation Lambda Function
The Lambda function will extract the name of thing that caused the alarm and add it to the Quarantine group (iot_cli.update_thing_groups_for_thing()). Using groups, you can easily locate things and apply additional policies restricting the operations they can execute, for example, post message to IoT topics. The function also updates the shadow of the Thing (iot_data_cli.update_thing_shadow()) to notify that it was quarantined.
def lambda_handler(event, context):
    ...
    msg = json.loads(event['Records'][0]['Sns']['Message'])

    thing_name = get_thing_name(msg)

    iot_cli.update_thing_groups_for_thing(
        thingName=thing_name,
        thingGroupsToAdd=[
            IOT_QUARANTINE_GROUP
        ]
    )

    payload = json.dumps({'state': { 'desired': { 'quarantine': True } }})

    iot_data_cli.update_thing_shadow(
        thingName=thing_name,
        payload=payload
    )

    return "OK"
DDD stands for Device Defender Detect. The Topic and Role used below were created during the preparation.
Understanding the Function Permissions and Role
The lambda function needs permission to add things to thing group (iot:AddThingToThingGroup) and update the shadow (iot:UpdateThingShadow).
{
    "Version": "2012-10-17",
    "Statement": [
        {
            "Sid": "VisualEditor0",
            "Effect": "Allow",
            "Action": [
                "iot:AddThingToThingGroup",
                "iot:UpdateThingGroupsForThing",
                "iot:UpdateThingShadow"
            ],
            "Resource": "arn:aws:iot:*:*:*"
        }
    ]
}
Configuring the AWS Lambda Function Trigger
You have configured AWS IoT Device Defender Detect to send events to SNS. Now, you need to trigger the lambda function, when events arrive on SNS.
- Open AWS Lambda console
- Choose the
AlertsLambda Function - Choose + Add trigger
- For Trigger type
SNS - Choose SNS
- Locate the Topic with
DDA_Alerts - Check if the trigger is enabled
- Choose Add
You have finished the configuration of the solution. Now it is time to test it!
Starting a Virtual Device
Your account has a virtual device factory that creates devices on demand. To create a new device, follow the step below:
- Open the Cloud9 Environment you created during the preparation
- Go to the root directory of the repository
cd ~/environment/aws-iot-playground
- Run the the following command to start a virtual device
./scripts/cp-create-thing.sh generic
This will start a virtual device that sends 30 messages every 5 minutes. After a 5 minutes, Device Defender should identify this anomalous behavior and send an Alert.
Monitoring Violations
If you want to follow the Violations detected by AWS IoT Device Defender Detect, you can follow the steps below.
aws iot list-active-violations
Output example:
aws iot list-active-violations
{
    "activeViolations": [
        {
            "violationId": "74de151f21724d91b89bcb87c1fa2c88",
            "thingName": "dev-XBHY",
            "securityProfileName": "MsgSentSecProfile",
            "behavior": {
                "name": "MsgSentBehavior",
                "metric": "aws:num-messages-sent",
                "criteria": {
                    "comparisonOperator": "less-than",
                    "value": {
                        "count": 10
                    },
                    "durationSeconds": 300,
                    "consecutiveDatapointsToAlarm": 1,
                    "consecutiveDatapointsToClear": 1
                }
            },
            "lastViolationValue": {
                "count": 27
            },
            "lastViolationTime": 1574254500.0,
            "violationStartTime": 1574254500.0
        }
    ]
}
Checking
The Alert will trigger the lambda function that will move the virtual device to the Quarantine Thing Group. You can check if it worked following the steps.
- Open the AWS IoT console
- In the left navigation pane, choose Defend
- In the left navigation pane, choose Detect
To check the thing groups for a specific device
$ aws iot list-thing-groups-for-thing \
    --thing-name <thing-name>
Sample output:
$ aws iot list-thing-groups-for-thing \
    --thing-name dev-XBHY
{
    "thingGroups": [
        {
            "groupName": "Quarantine",
            "groupArn": "arn:aws:iot:us-east-1:883951760139:thinggroup/Quarantine"
        }
    ]
}
To check the shadow for a specific devic.
$ aws iot-data get-thing-shadow \
    --thing-name <device-name> \
    /tmp/shadow_output

$ jq . /tmp/shadow_output
sample output:
$ aws iot-data get-thing-shadow \
    --thing-name dev-XBHY \
    /tmp/shadow_output

$ jq . /tmp/shadow_output
{
  "state": {
    "desired": {
      "debug": "off",
      "quarantine": true
    },
    "delta": {
      "debug": "off",
      "quarantine": true
    }
  },
  "metadata": {
    "desired": {
      "debug": {
        "timestamp": 1574251760
      },
      "quarantine": {
        "timestamp": 1574254539
      }
    }
  },
  "version": 2,
  "timestamp": 1574256114
}
Conclusion
Good job, IoT Fleet Manager! You learned how to setup AWS IoT Device Defender Detect, create a lambda function, and mitigate an existing threat.
